> ## Documentation Index
> Fetch the complete documentation index at: https://centrixnodes-mintlify-039aa6e3.mintlify.site/llms.txt
> Use this file to discover all available pages before exploring further.
# Add a Remote Desktop user on Windows VPS
> Create additional Remote Desktop (RDP) user accounts on a Windows VPS or dedicated server so multiple people can log in with their own credentials.
## Step 1: Open Computer Management
To begin adding a new user for Remote Desktop access, you need to open Computer Management. You can do this by searching for "Computer Management" in the Windows search bar.
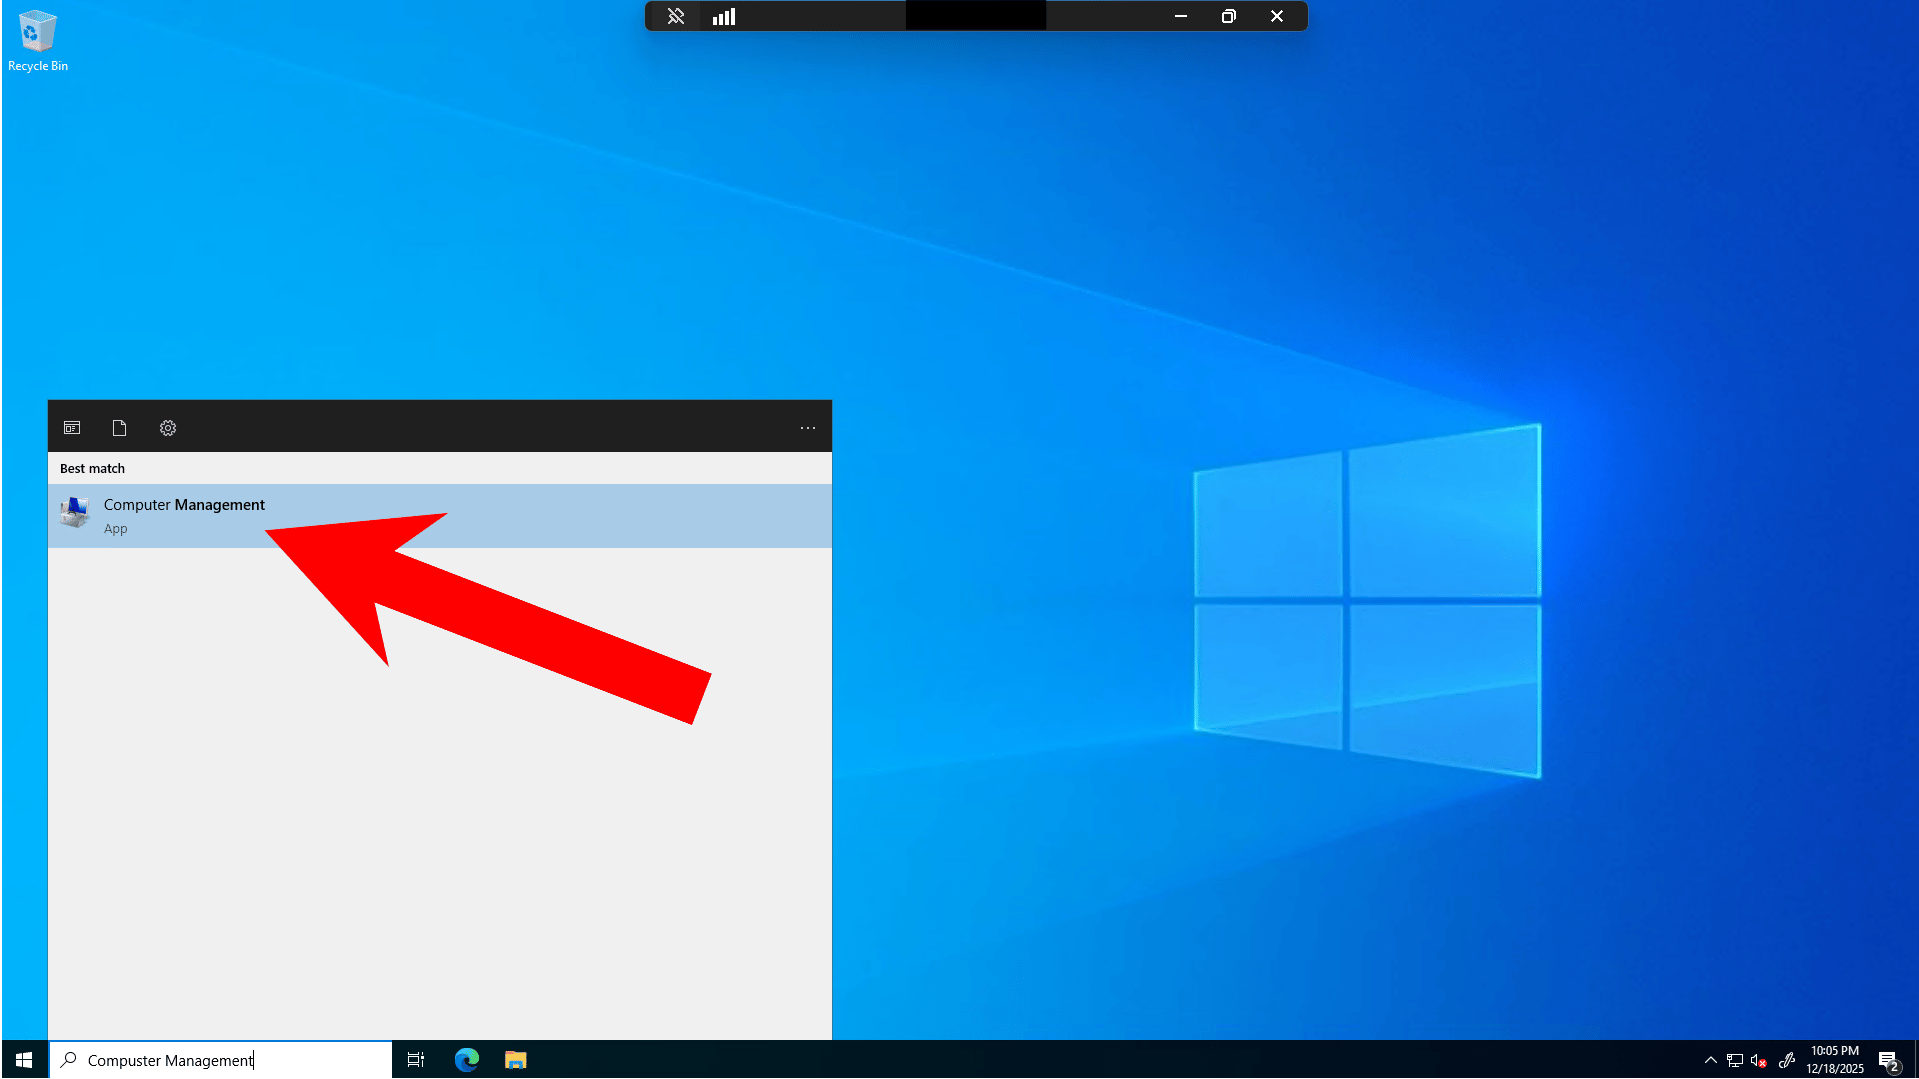 Click on the **Computer Management** app from the search results to open it.
## Step 2: Navigate to Local Users and Groups
Once Computer Management is open, you'll see a tree structure on the left side. Navigate to **System Tools** → **Local Users and Groups**.
Click on the **Computer Management** app from the search results to open it.
## Step 2: Navigate to Local Users and Groups
Once Computer Management is open, you'll see a tree structure on the left side. Navigate to **System Tools** → **Local Users and Groups**.
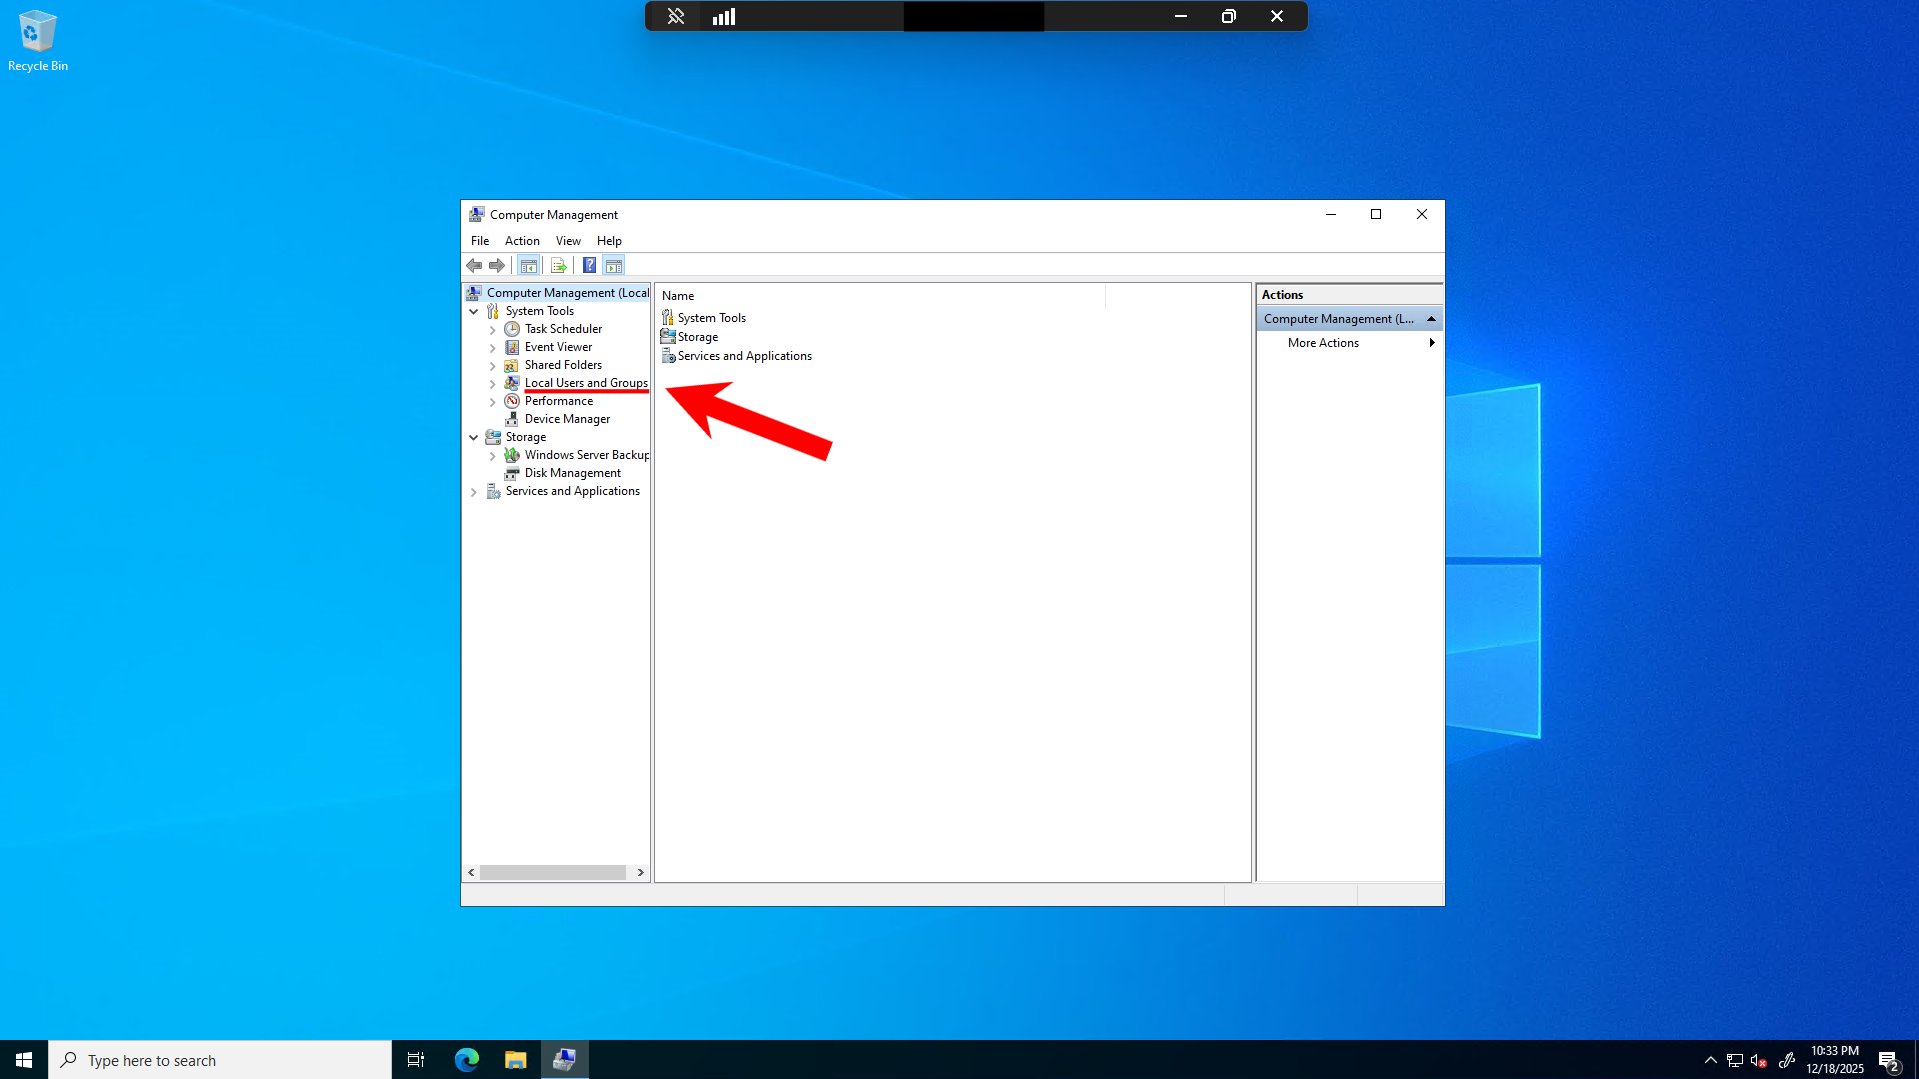 The red arrow indicates that you need to select **Local Users and Groups** in the navigation pane.
## Step 3: Create a New User
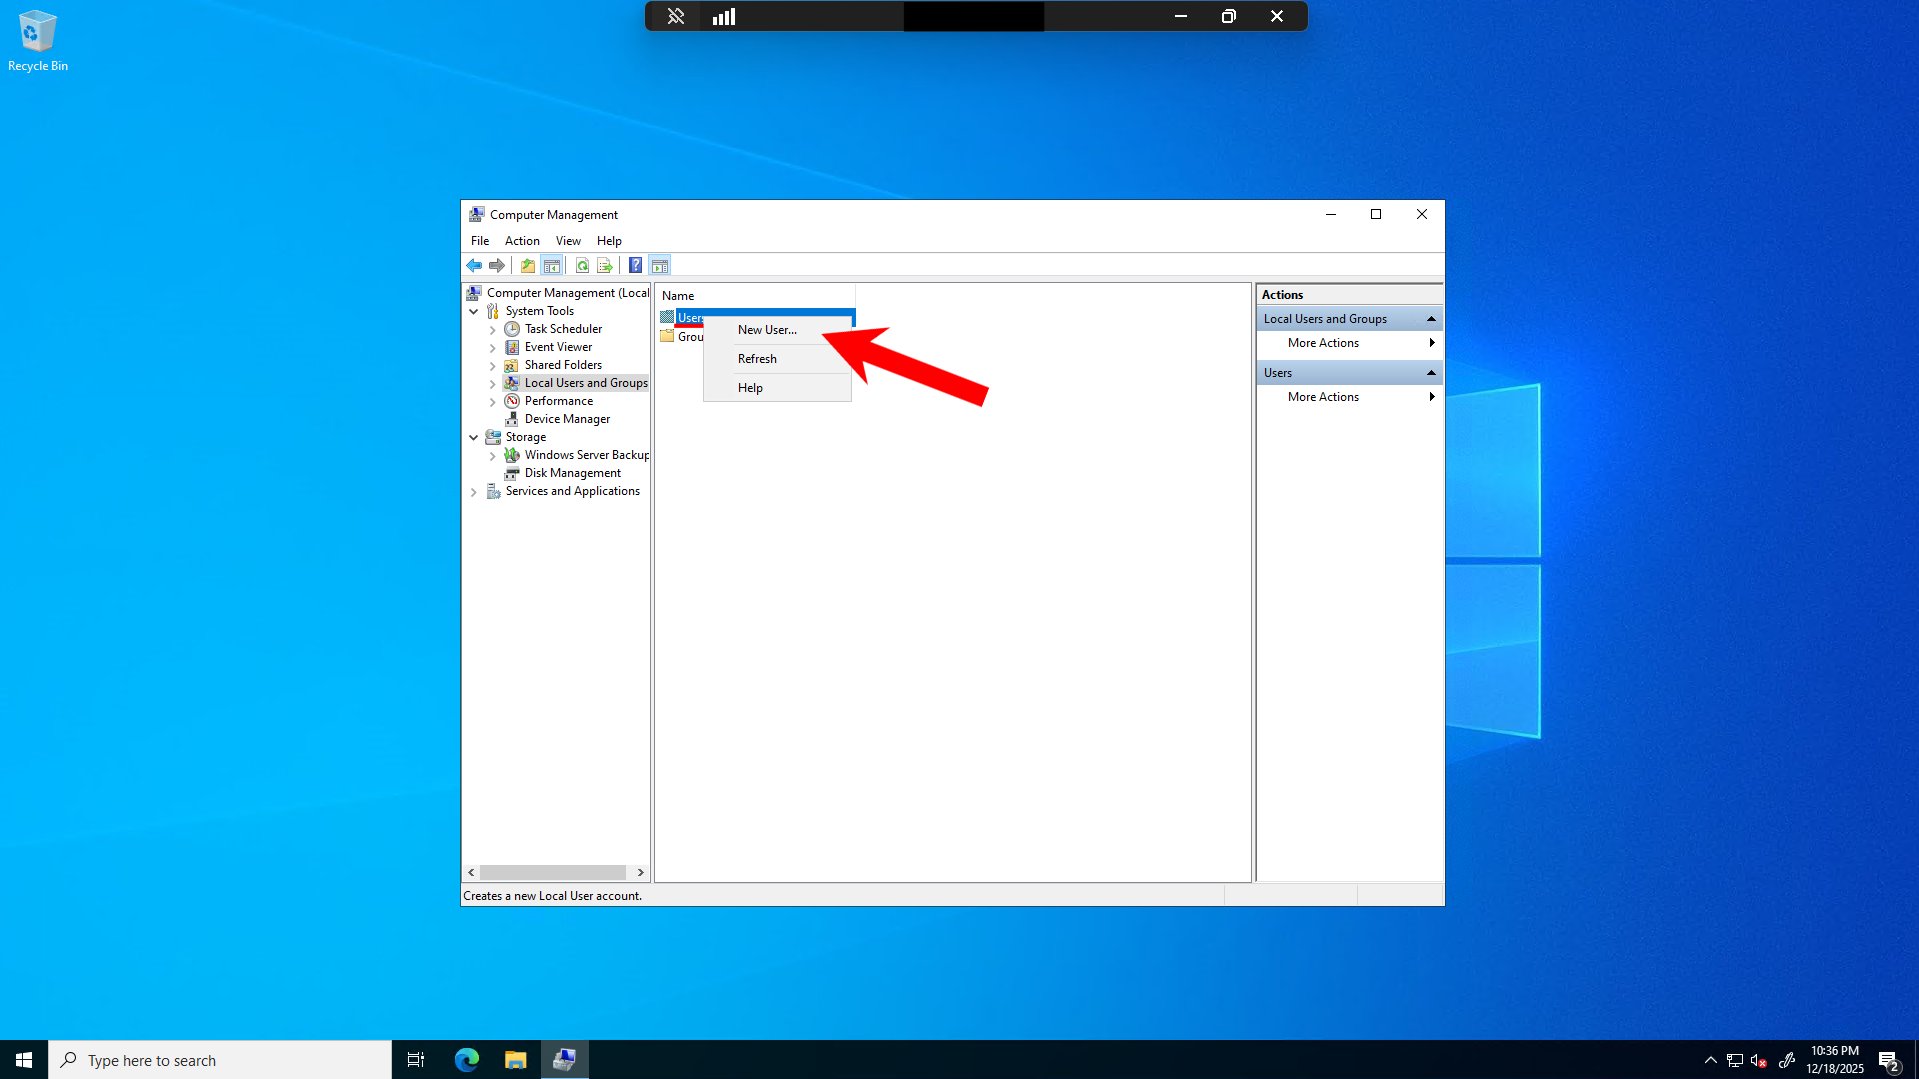
Expand **Local Users and Groups** and select **Users**. Right-click on **Users** in the right panel and select **New User** from the context menu.
The red arrow indicates that you need to select **Local Users and Groups** in the navigation pane.
## Step 3: Create a New User
Expand **Local Users and Groups** and select **Users**. Right-click on **Users** in the right panel and select **New User** from the context menu.
 ## Step 4: Fill in User Details
A "New User" dialog box will appear where you need to enter the new user's information. Fill in the required fields as indicated by the red arrow.
## Step 4: Fill in User Details
A "New User" dialog box will appear where you need to enter the new user's information. Fill in the required fields as indicated by the red arrow.
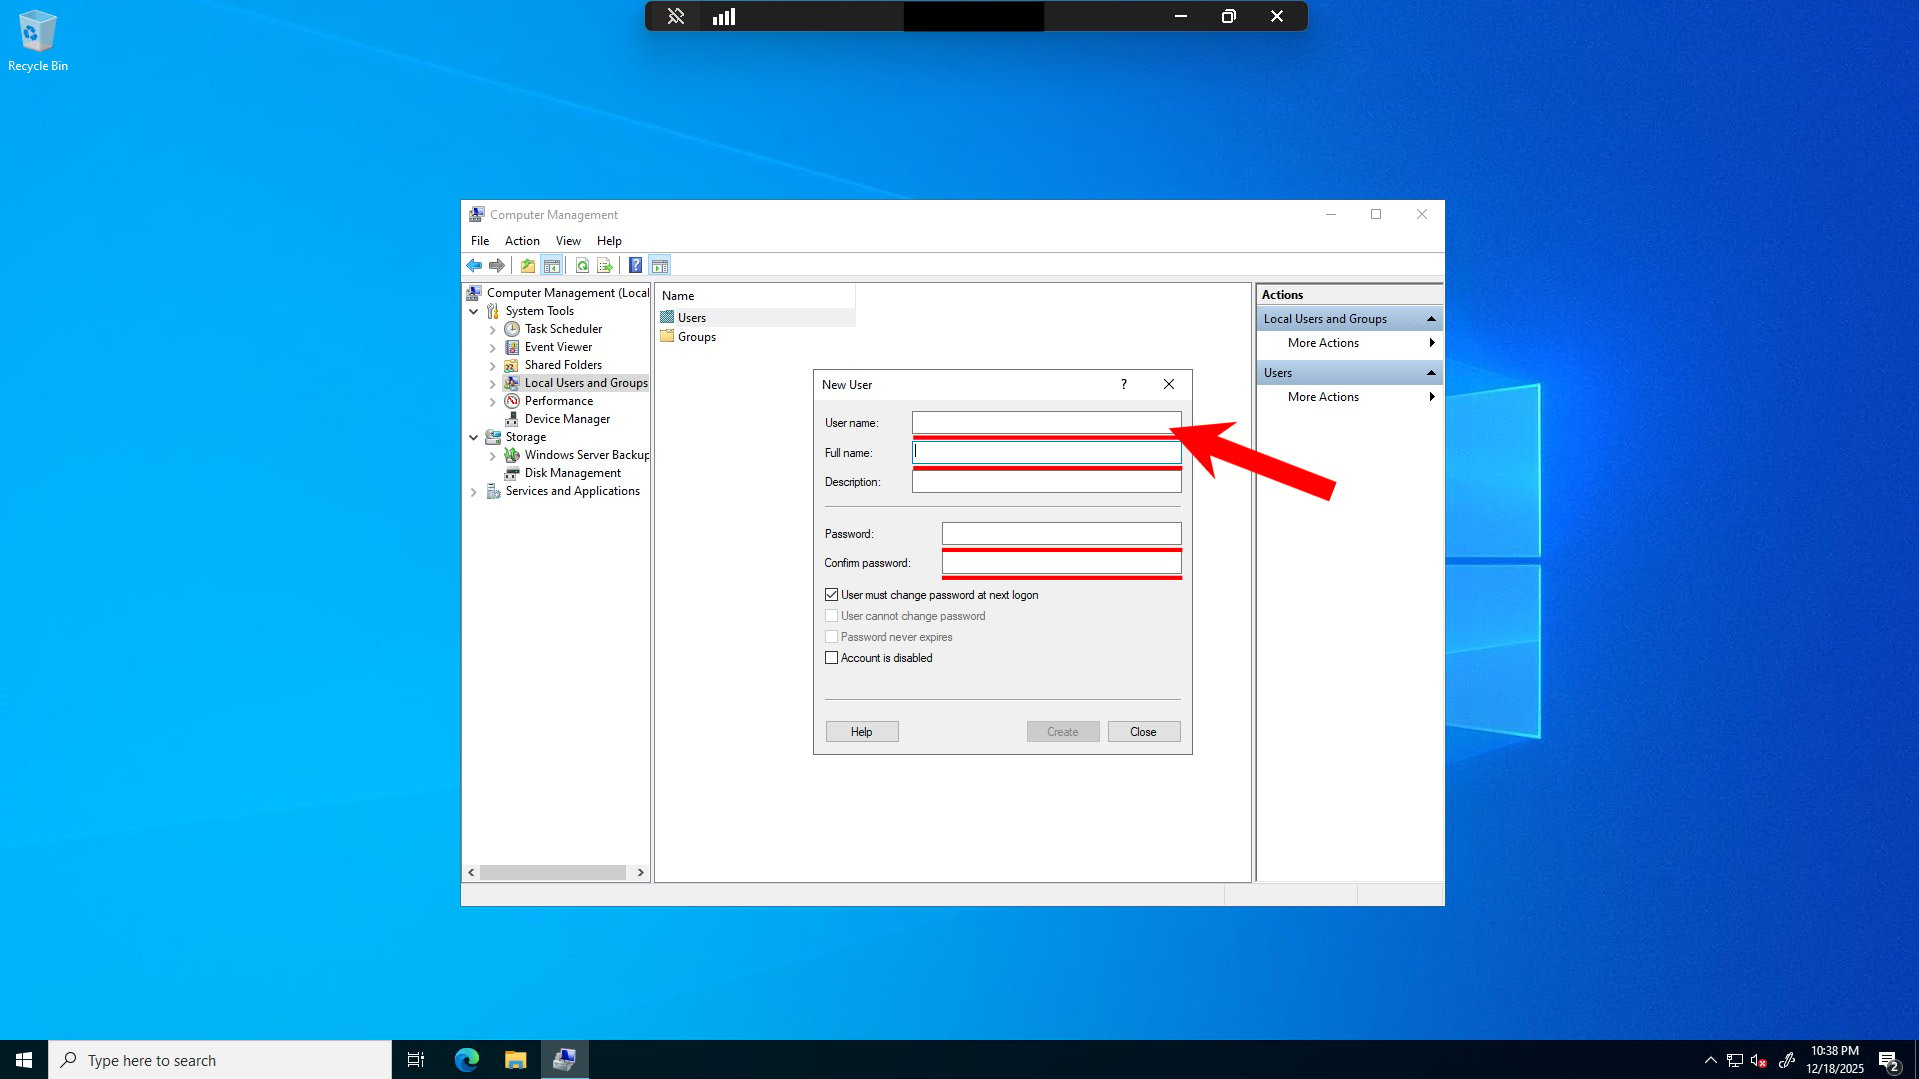 Fill in the following fields:
* **User name**: Enter a username for the new account
* **Full name**: (Optional) Enter the full name of the user
* **Description**: (Optional) Add a description for this account
* **Password**: Enter a strong password for the account
* **Confirm password**: Re-enter the password to confirm
Make sure to use a strong password that meets Windows security requirements. It's recommended to use a combination of uppercase letters, lowercase letters, numbers, and special characters.
## Step 5: Uncheck Password Change Requirement
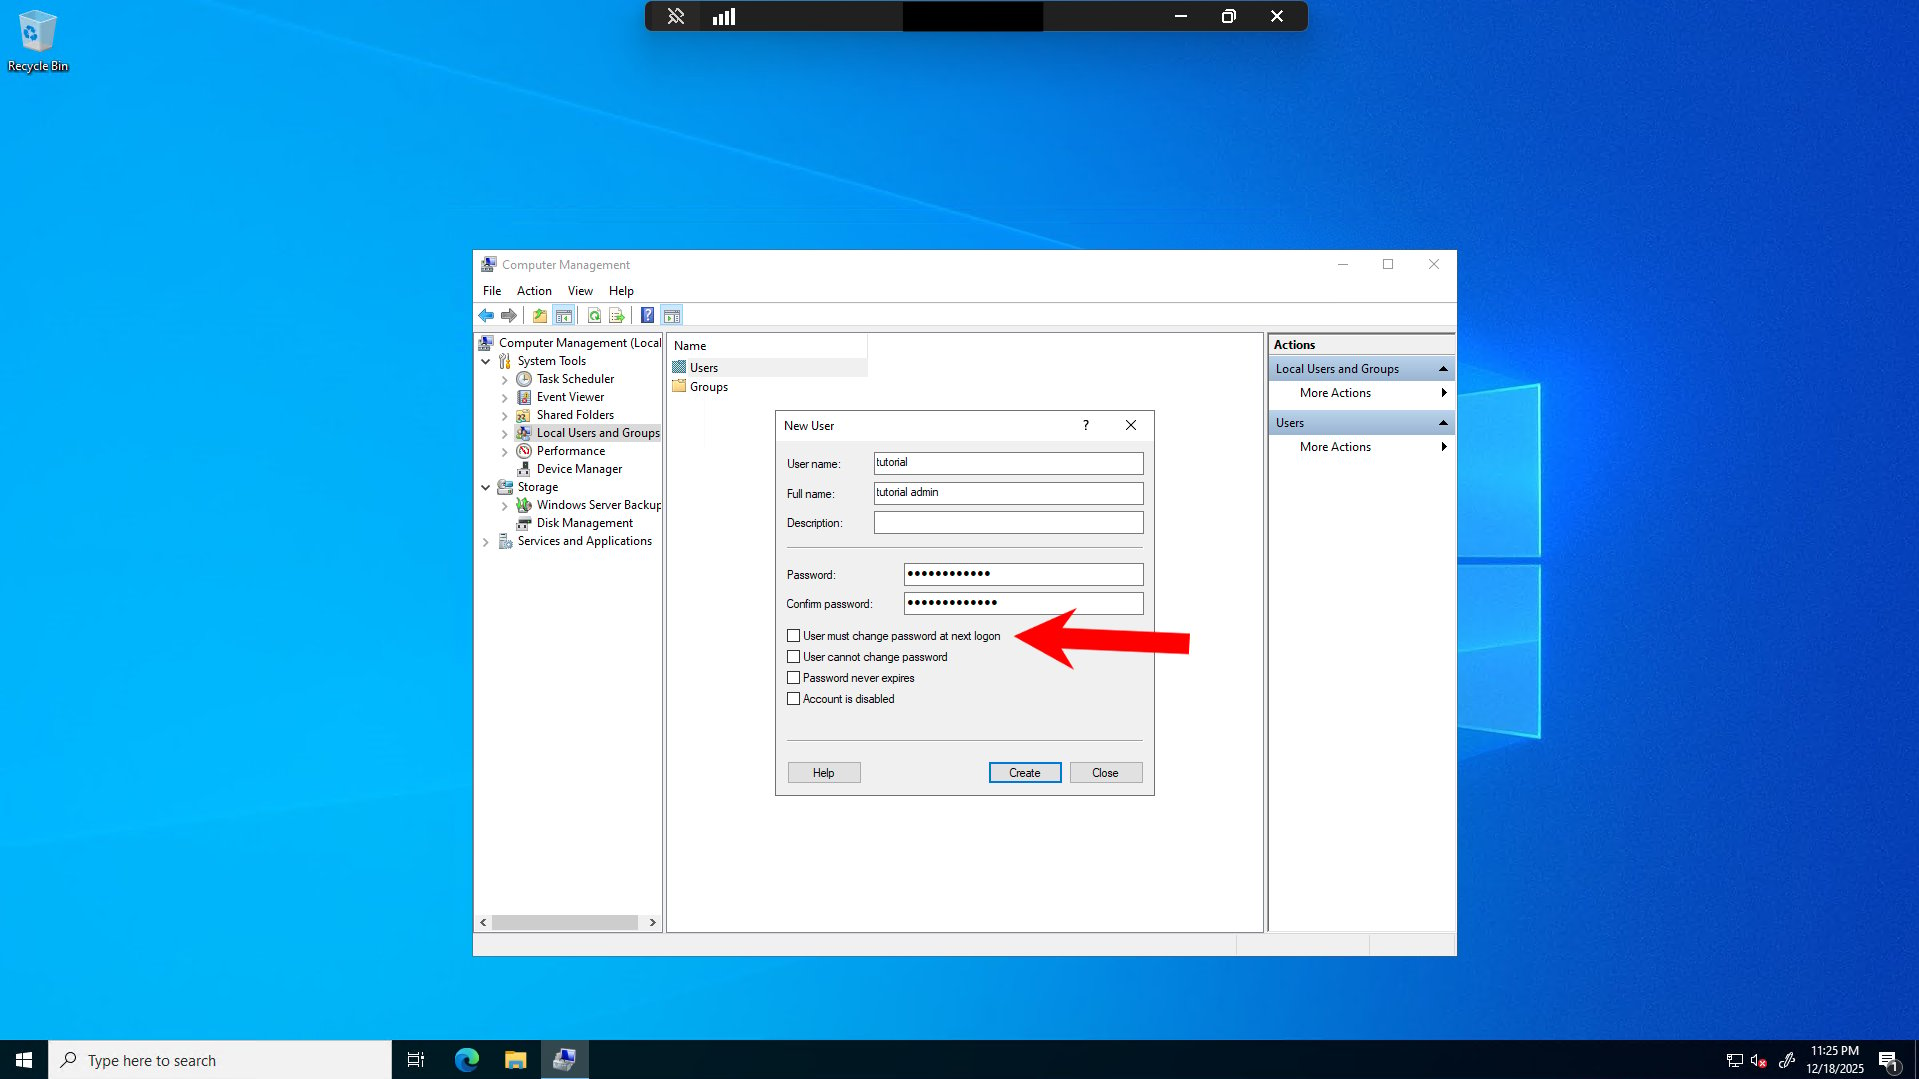
After filling in the user details, **uncheck** the "User must change password at next logon" checkbox as shown in the image.
Fill in the following fields:
* **User name**: Enter a username for the new account
* **Full name**: (Optional) Enter the full name of the user
* **Description**: (Optional) Add a description for this account
* **Password**: Enter a strong password for the account
* **Confirm password**: Re-enter the password to confirm
Make sure to use a strong password that meets Windows security requirements. It's recommended to use a combination of uppercase letters, lowercase letters, numbers, and special characters.
## Step 5: Uncheck Password Change Requirement
After filling in the user details, **uncheck** the "User must change password at next logon" checkbox as shown in the image.
 ## Step 6: Create the User Account
After unchecking the password change requirement, click the **Create** button as indicated by the red arrow.
## Step 6: Create the User Account
After unchecking the password change requirement, click the **Create** button as indicated by the red arrow.
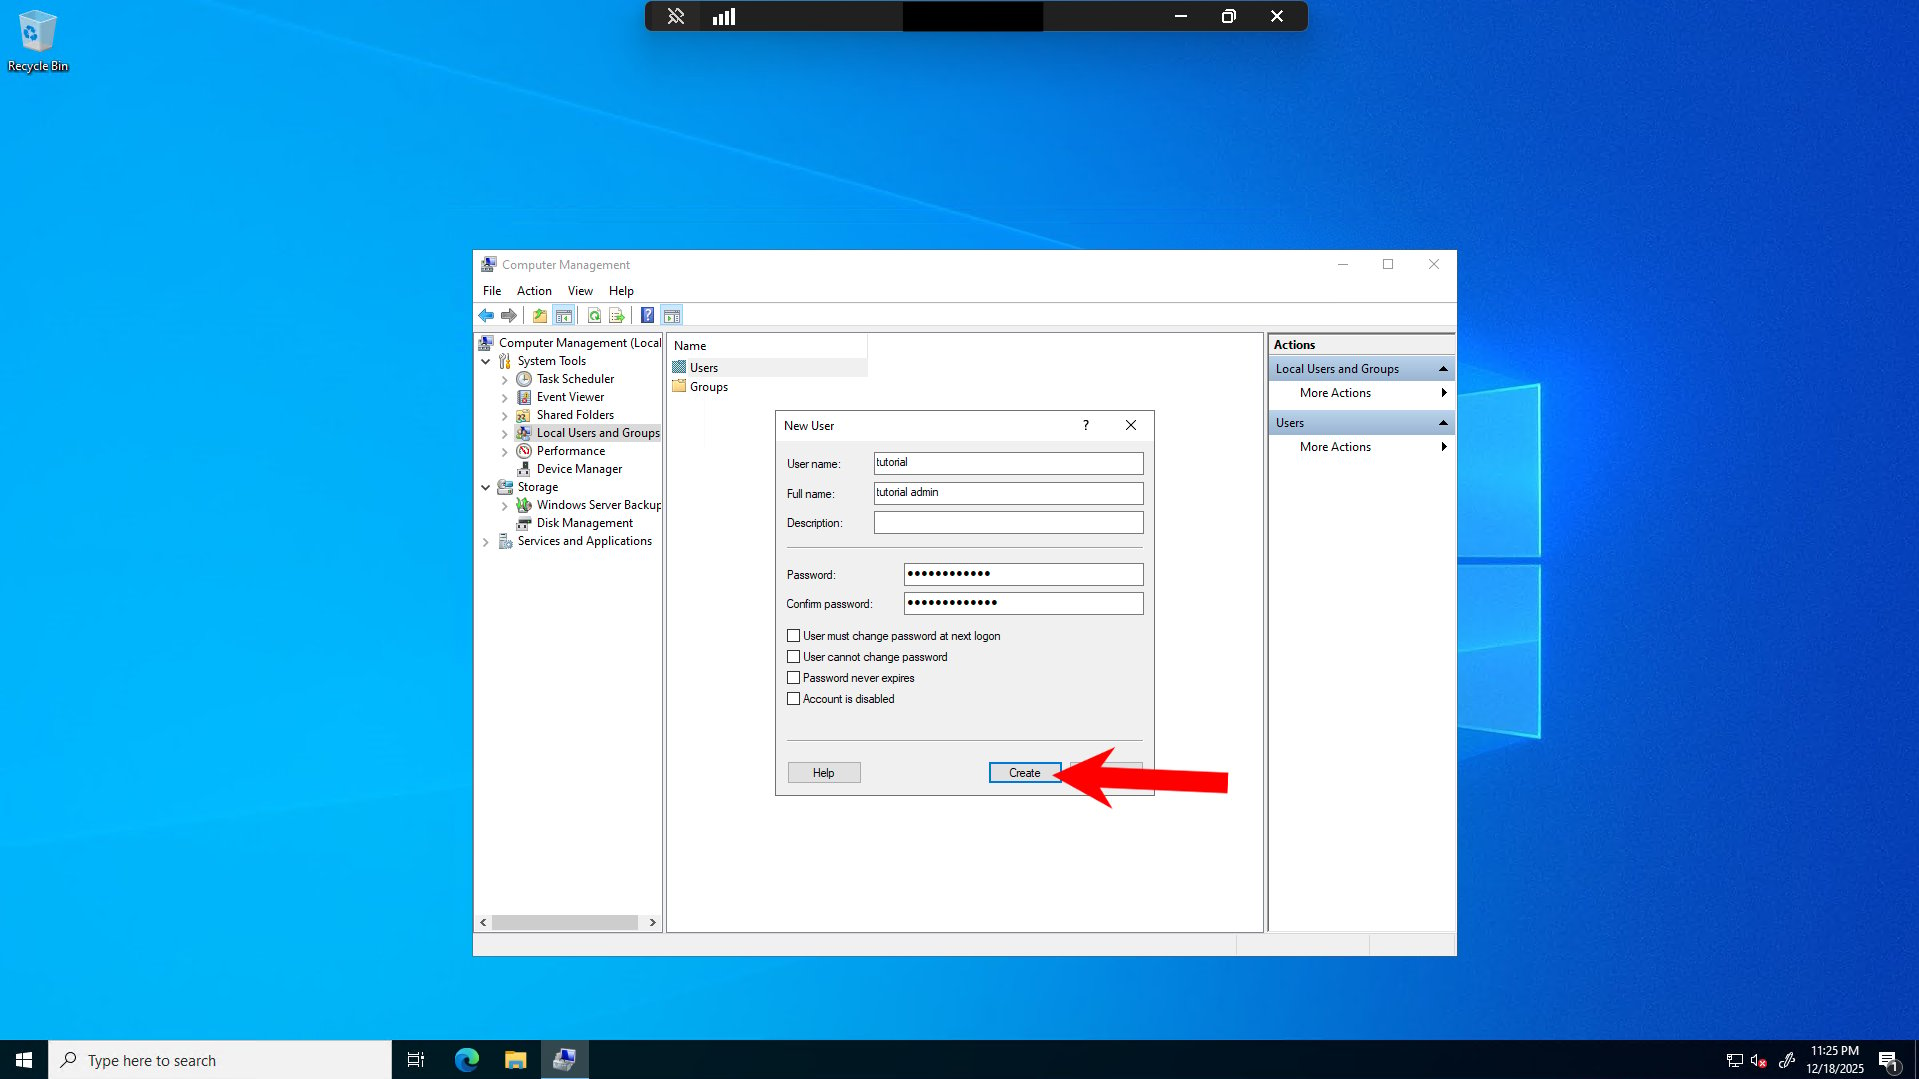 This will create the user account. You can create multiple users by clicking **Create** again, or click **Close** when you're done.
## Step 7: Navigate to Groups
Now that the user account has been created, you need to add it to the **Remote Desktop Users** group. In the left navigation pane, expand **Local Users and Groups** and select **Groups**.
This will create the user account. You can create multiple users by clicking **Create** again, or click **Close** when you're done.
## Step 7: Navigate to Groups
Now that the user account has been created, you need to add it to the **Remote Desktop Users** group. In the left navigation pane, expand **Local Users and Groups** and select **Groups**.
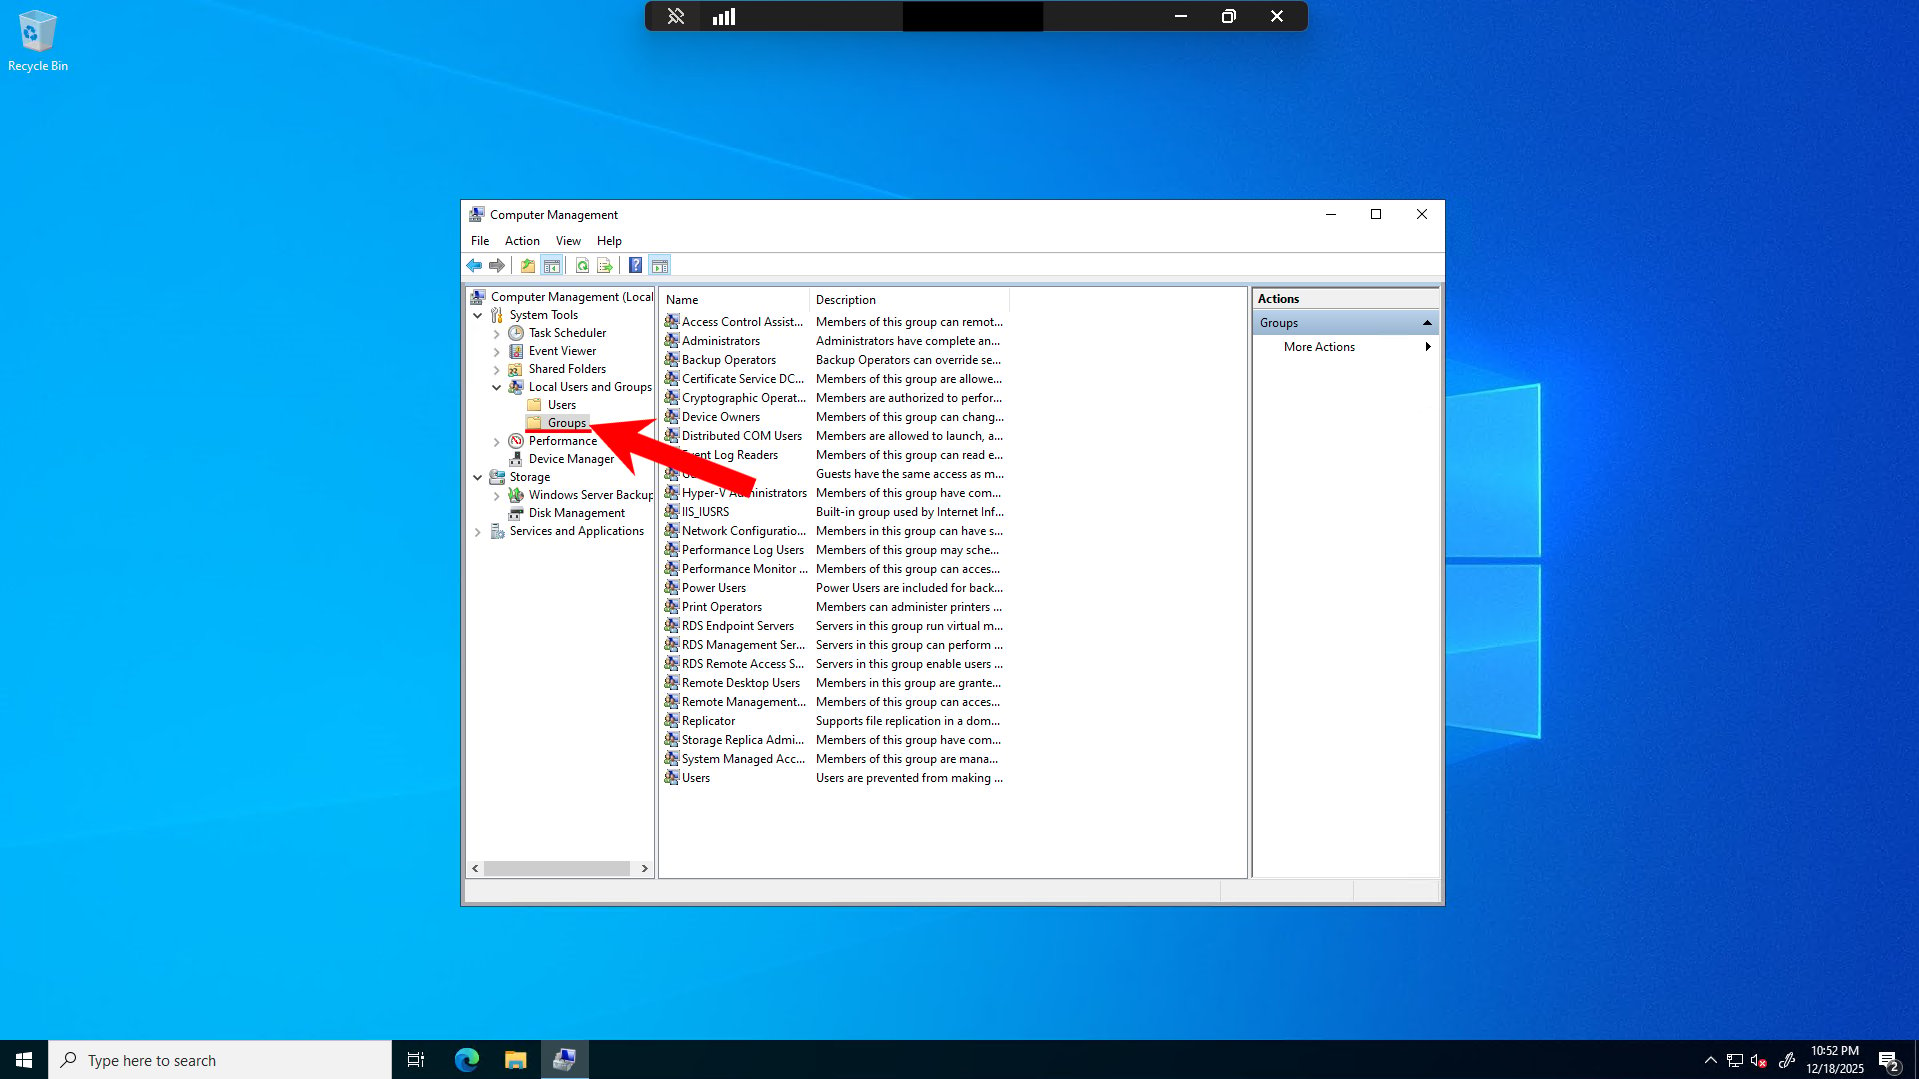 The red arrow indicates that you need to select **Groups** in the navigation tree.
## Step 8: Select Remote Desktop Users Group
In the middle pane, you'll see a list of all local groups. Find and select the **Remote Desktop Users** group from the list.
The red arrow indicates that you need to select **Groups** in the navigation tree.
## Step 8: Select Remote Desktop Users Group
In the middle pane, you'll see a list of all local groups. Find and select the **Remote Desktop Users** group from the list.
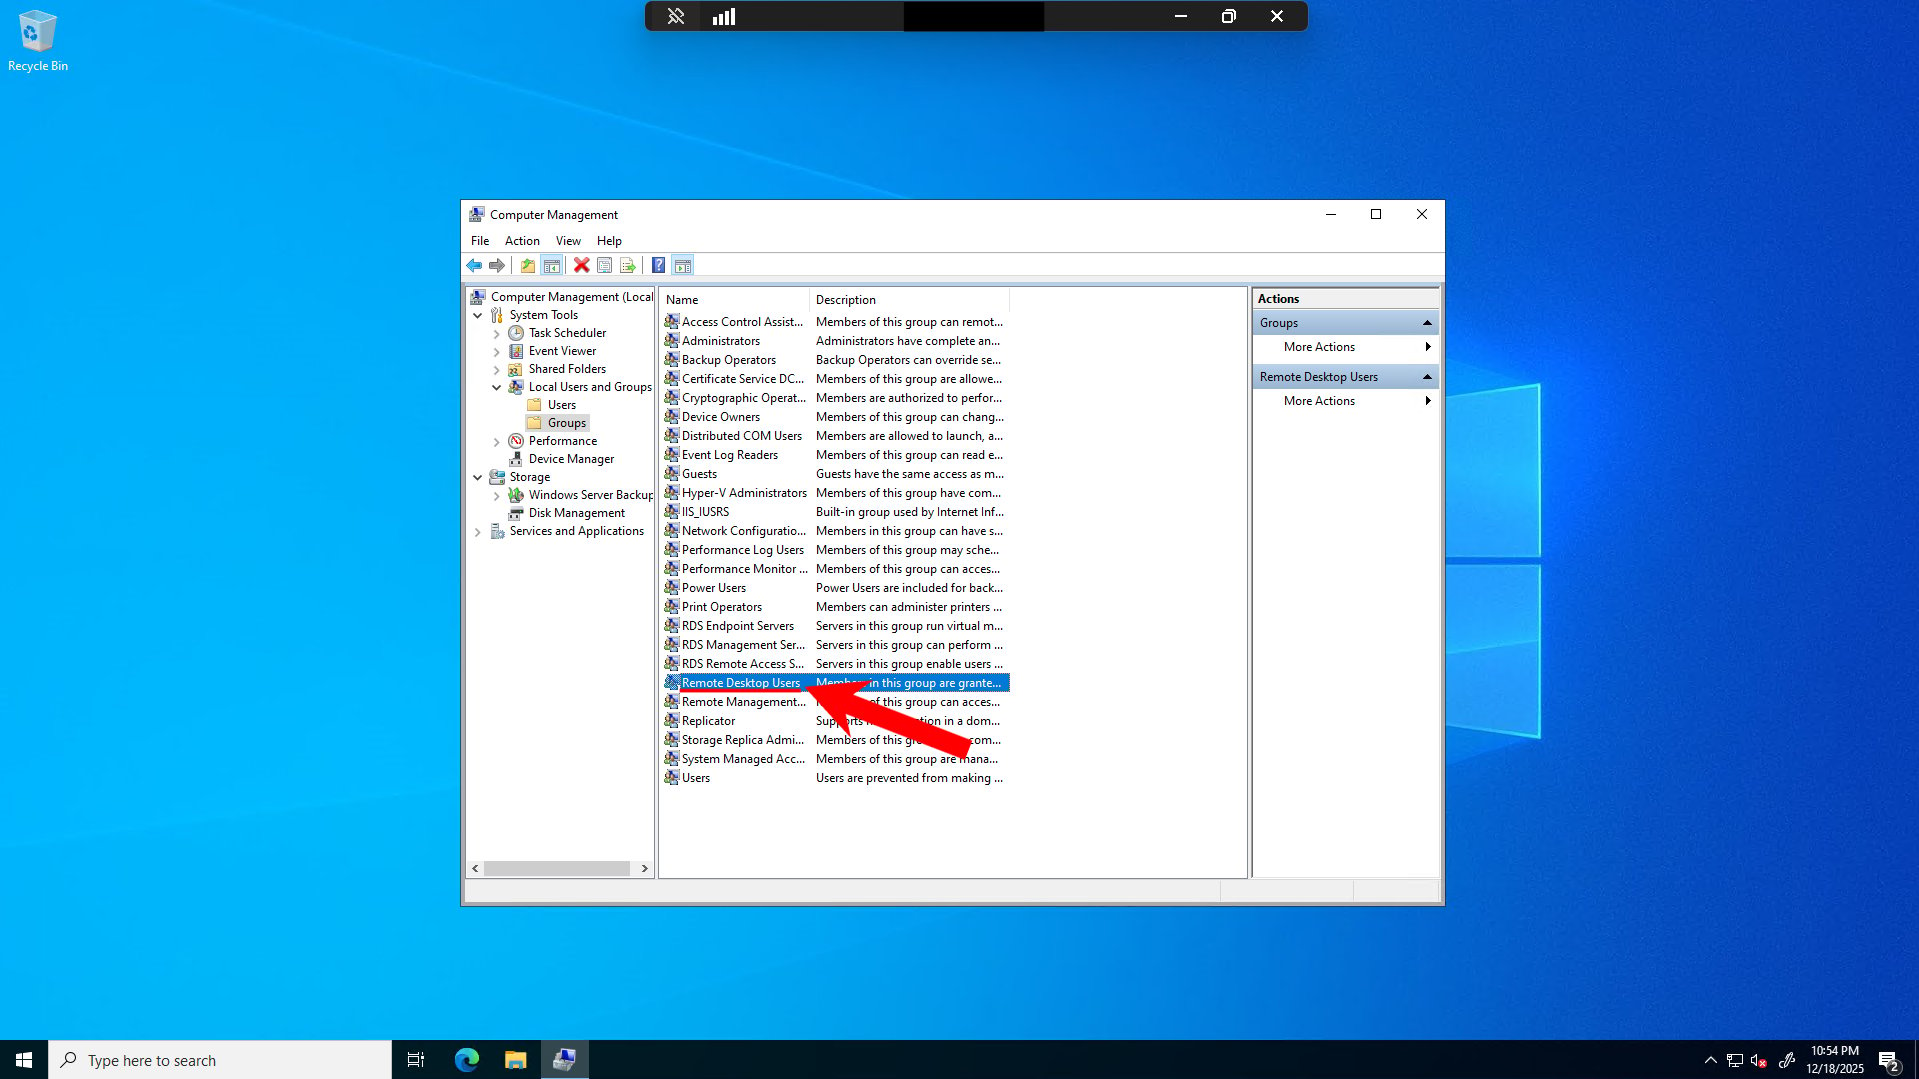 The red arrow points to the **Remote Desktop Users** group, which should be highlighted when selected.
## Step 9: Open Remote Desktop Users Properties
Right-click on the **Remote Desktop Users** group and select **Properties** from the context menu, or double-click on it to open its properties. The "Remote Desktop Users Properties" dialog will open.
The red arrow points to the **Remote Desktop Users** group, which should be highlighted when selected.
## Step 9: Open Remote Desktop Users Properties
Right-click on the **Remote Desktop Users** group and select **Properties** from the context menu, or double-click on it to open its properties. The "Remote Desktop Users Properties" dialog will open.
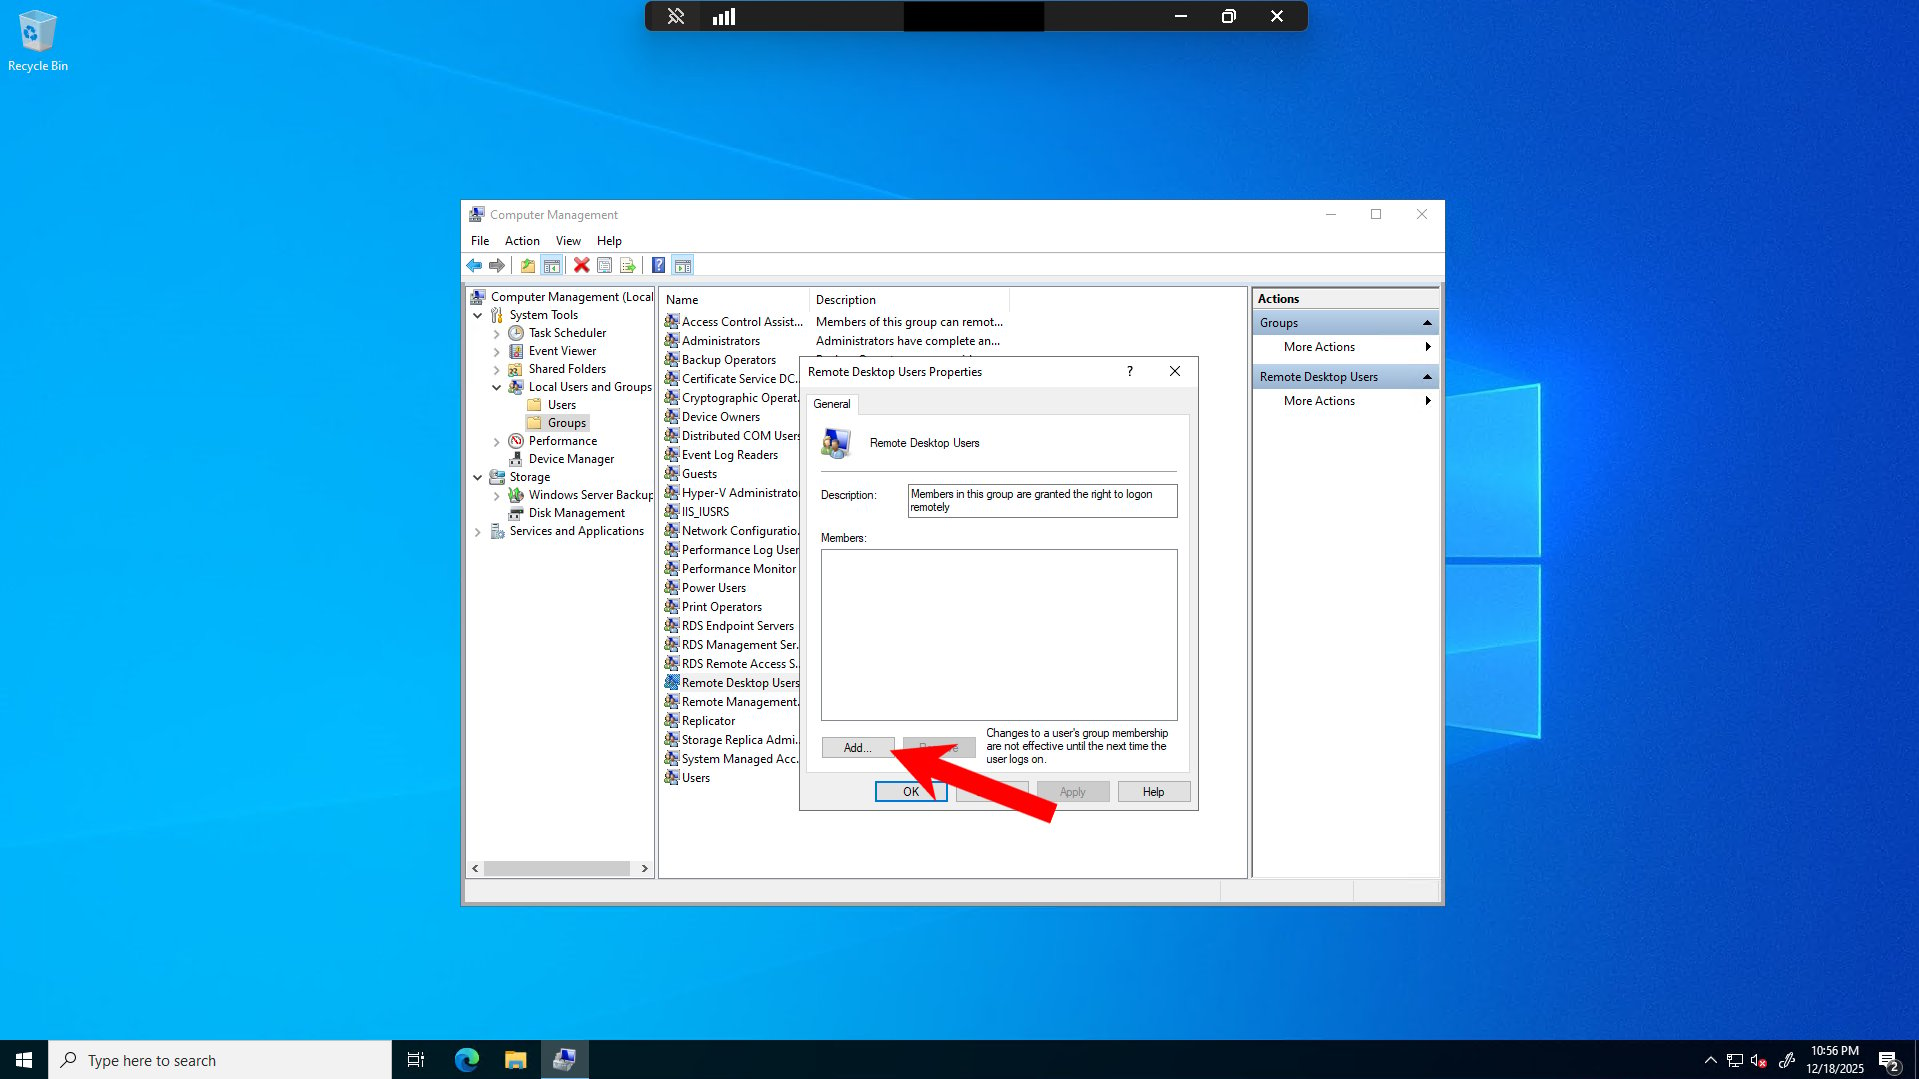 The dialog shows the group's general information and a list of current members. Click the **Add** button as indicated by the red arrow to add a user to this group.
## Step 10: Enter User Name
The "Select Users" dialog will open. Type the username of the user you created earlier in the text field.
The dialog shows the group's general information and a list of current members. Click the **Add** button as indicated by the red arrow to add a user to this group.
## Step 10: Enter User Name
The "Select Users" dialog will open. Type the username of the user you created earlier in the text field.
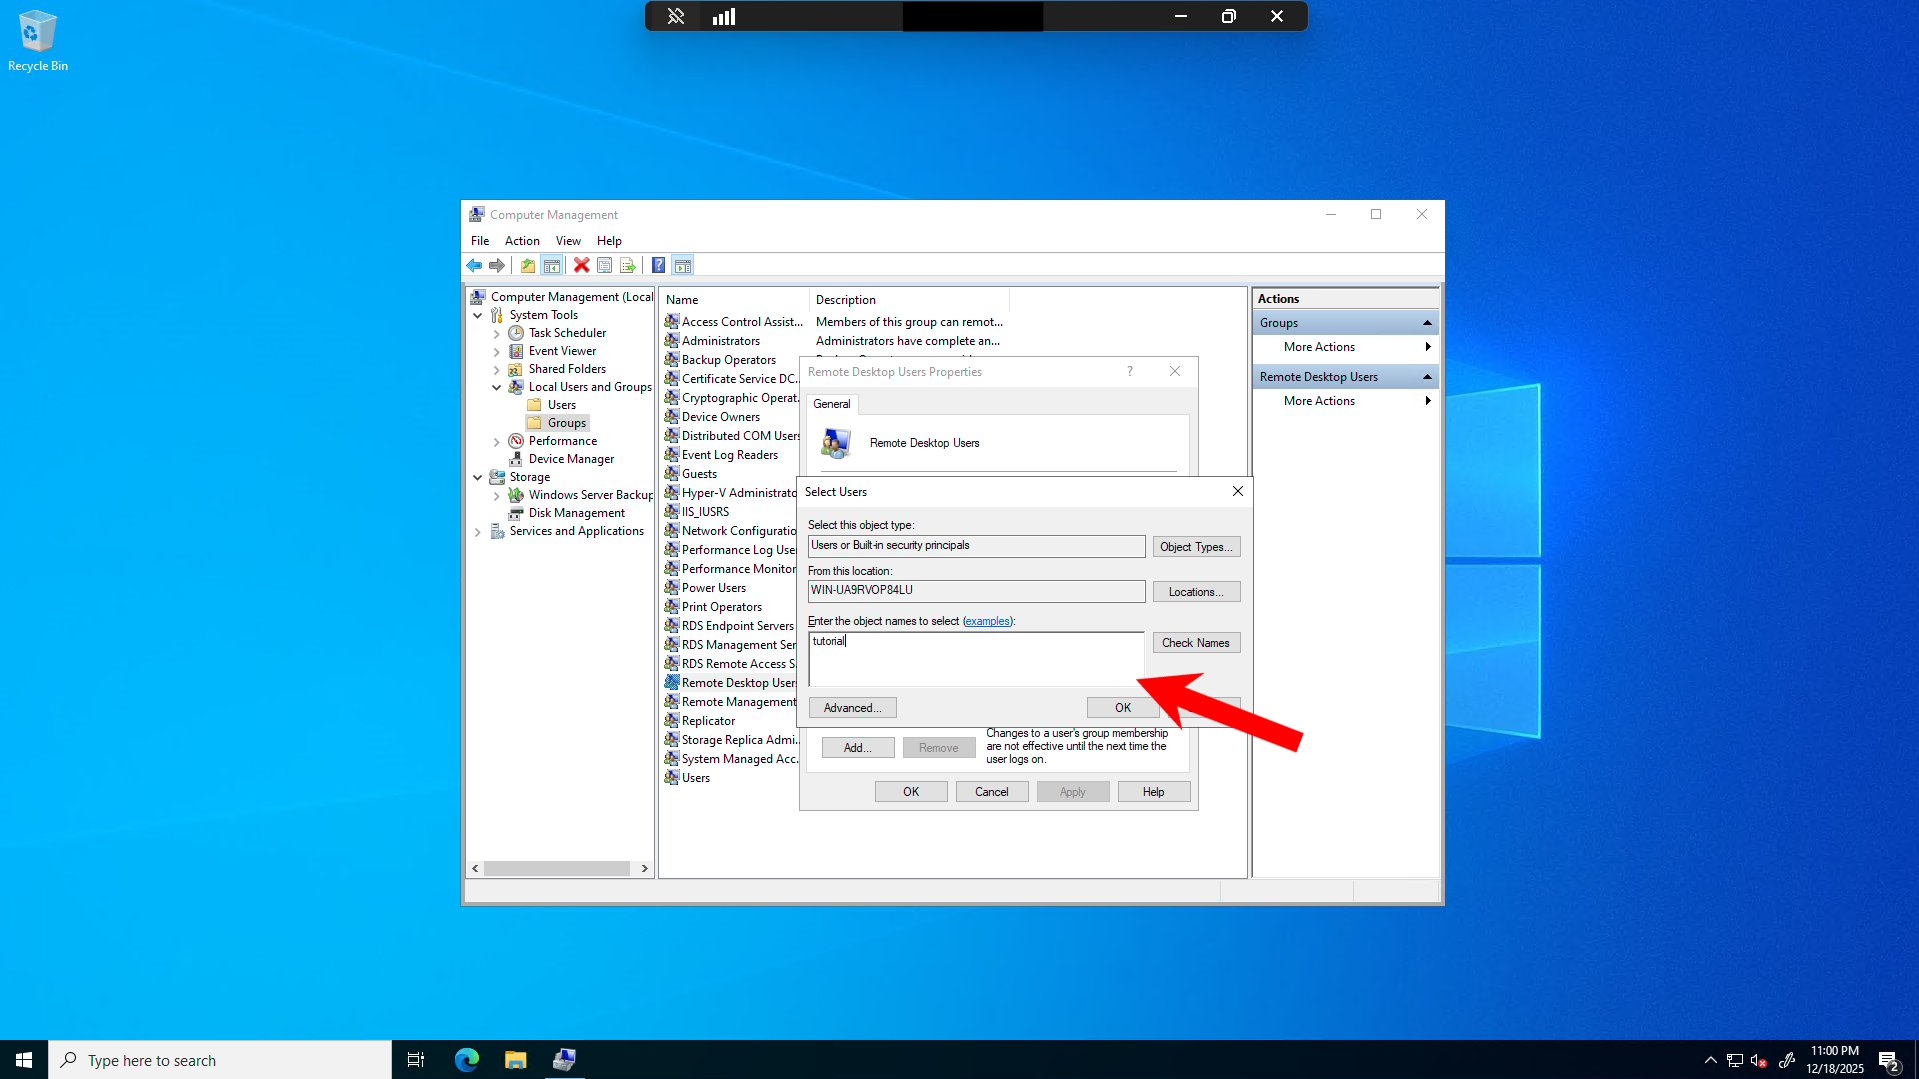 You can also click **Advanced** to search for users, or click **Check Names** to verify the username is correct.
## Step 11: Verify User Name
Click **Check Names** to verify the username. Windows will underline the username if it's valid and recognized.
You can also click **Advanced** to search for users, or click **Check Names** to verify the username is correct.
## Step 11: Verify User Name
Click **Check Names** to verify the username. Windows will underline the username if it's valid and recognized.
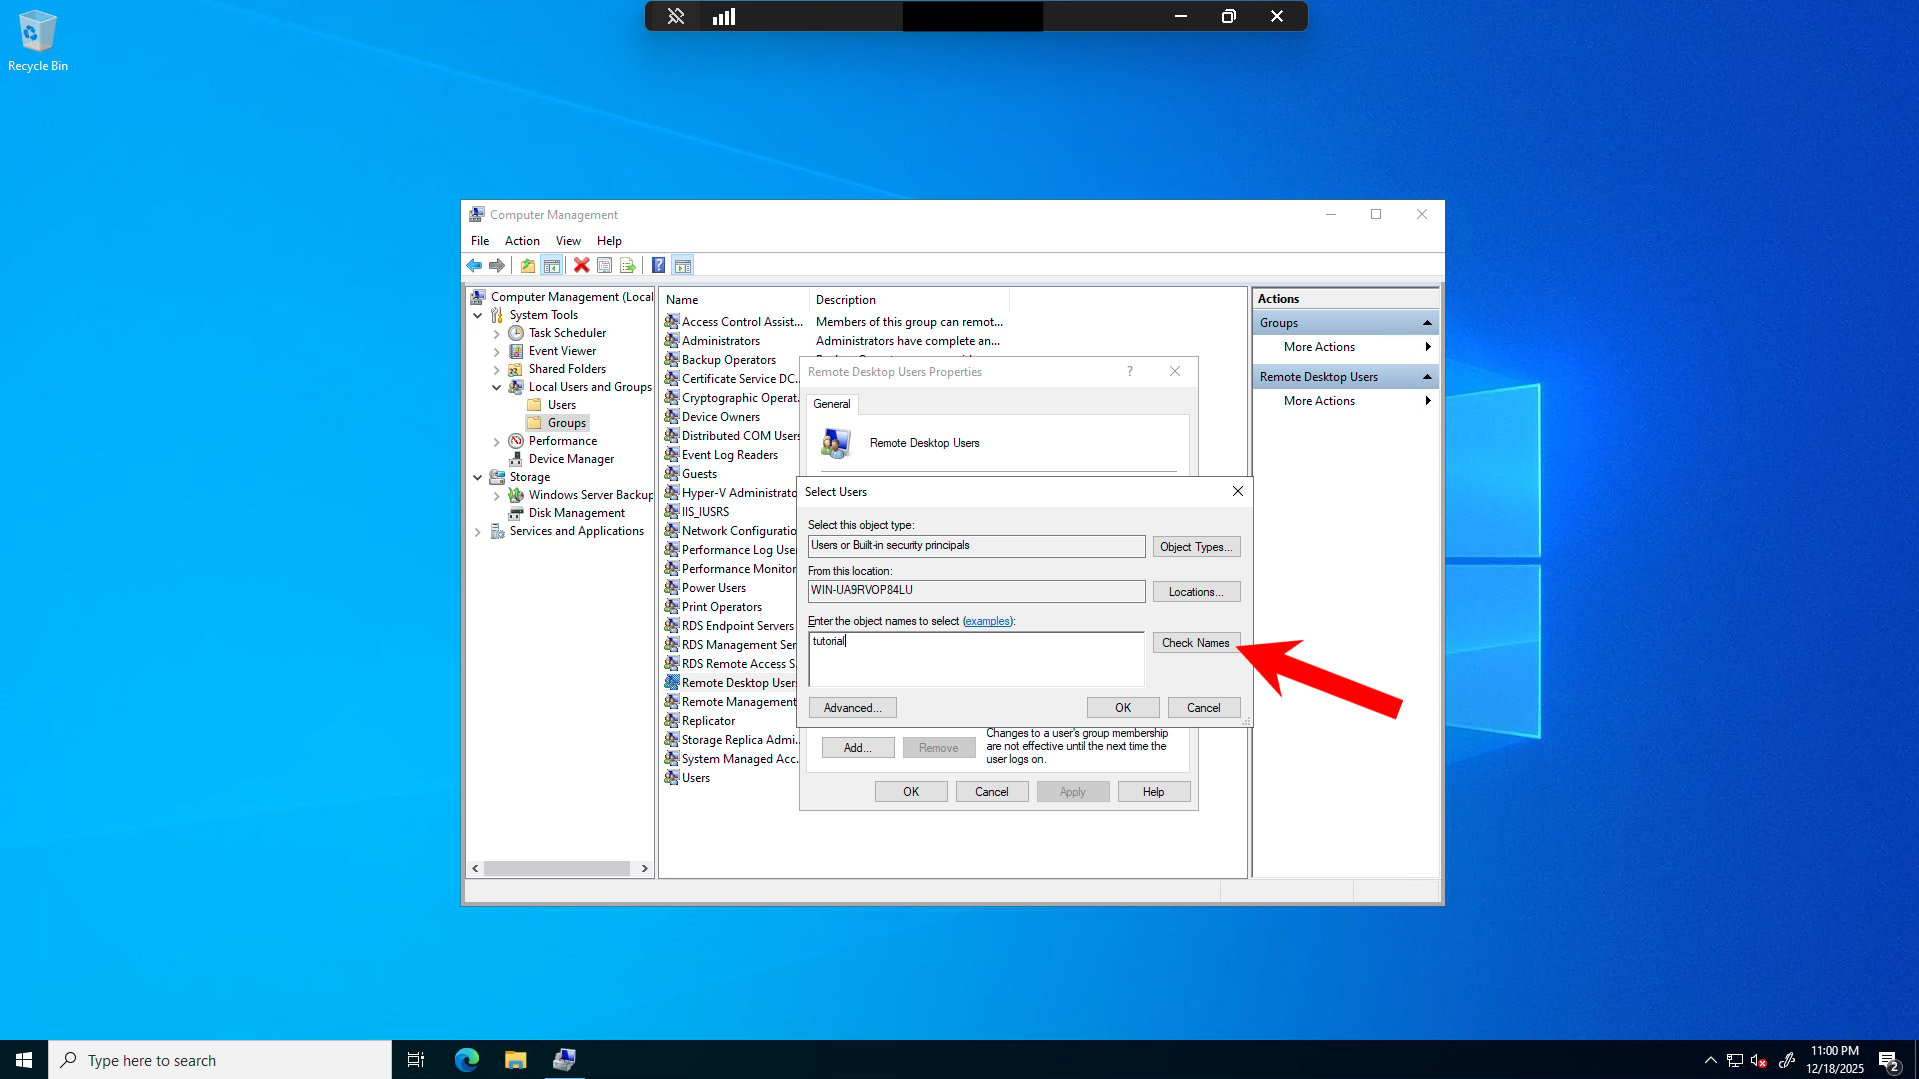 Once the username is verified and underlined, click **OK** to proceed.
## Step 12: Complete Adding User to Group
After clicking **OK**, the user will be added to the Remote Desktop Users group. The "Select Users" dialog will close, and you'll return to the "Remote Desktop Users Properties" dialog where you can see the user listed in the Members section.
Once the username is verified and underlined, click **OK** to proceed.
## Step 12: Complete Adding User to Group
After clicking **OK**, the user will be added to the Remote Desktop Users group. The "Select Users" dialog will close, and you'll return to the "Remote Desktop Users Properties" dialog where you can see the user listed in the Members section.
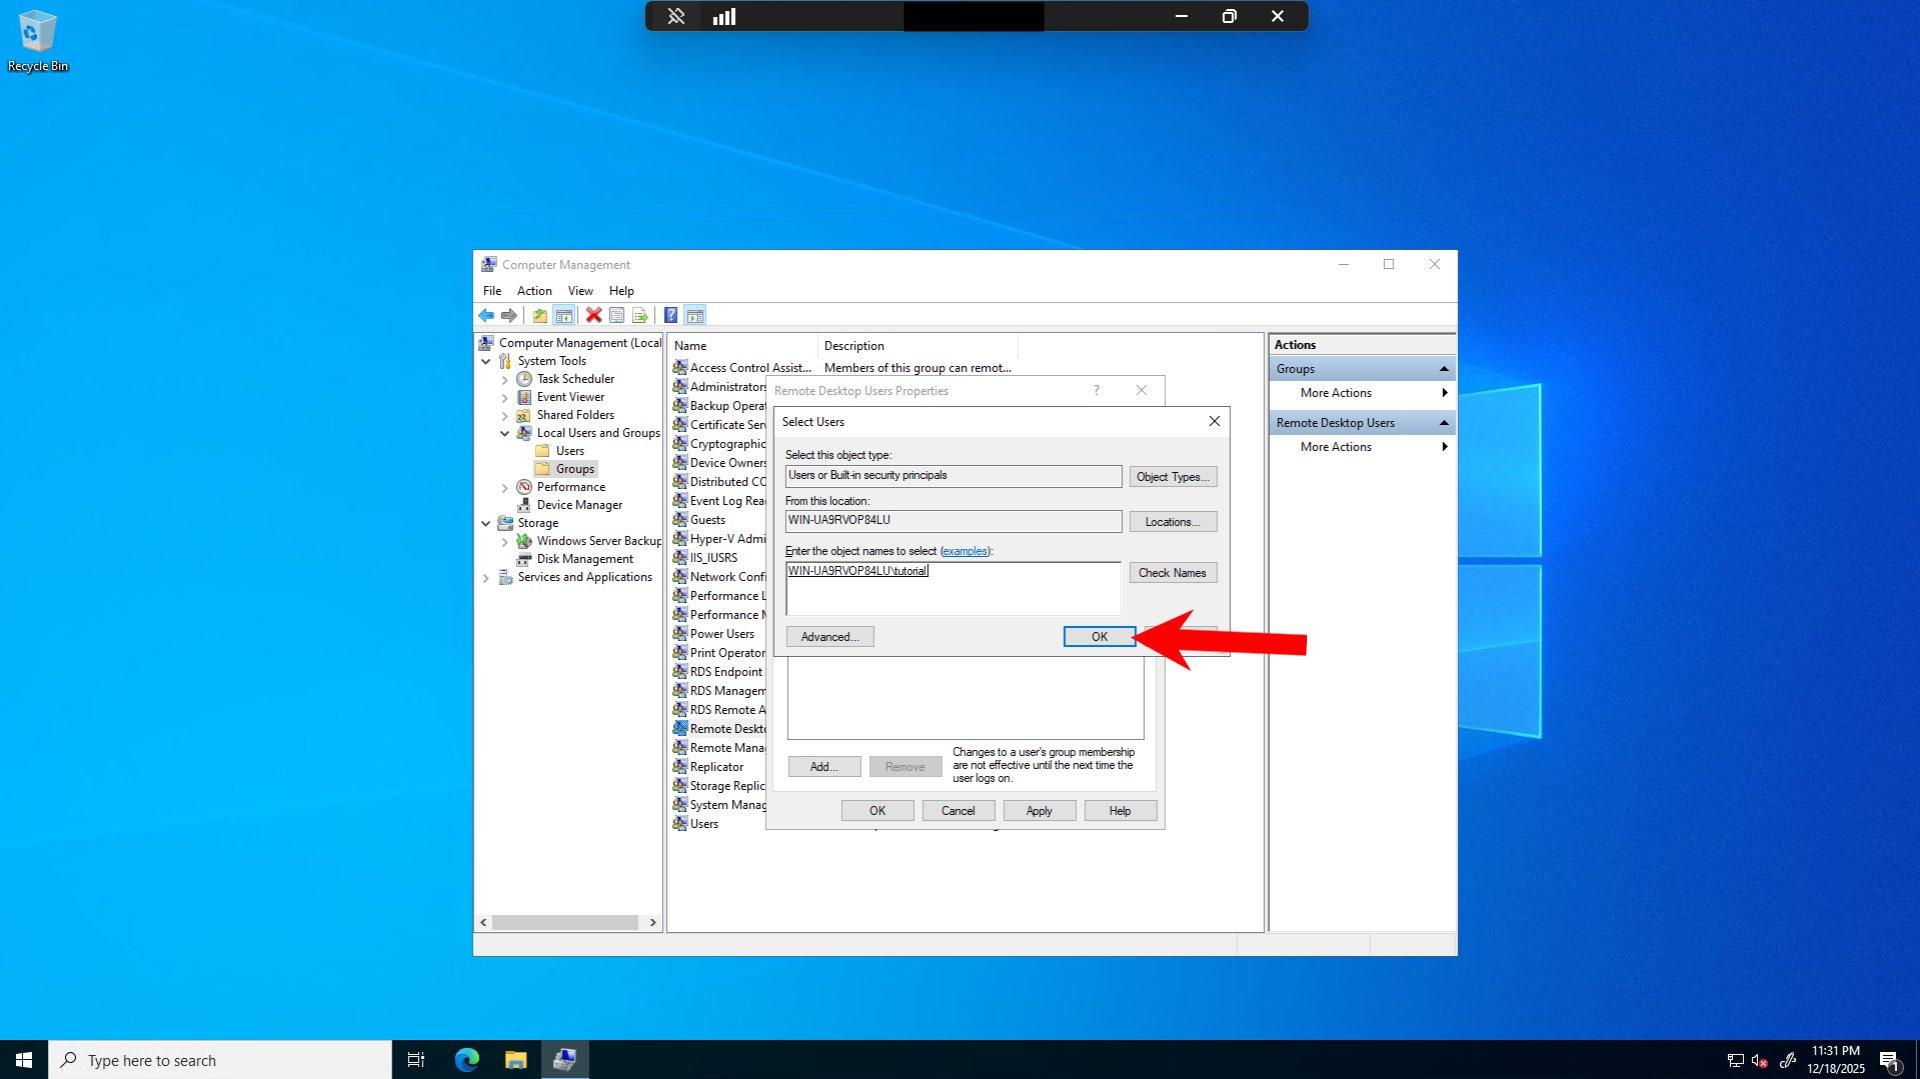 Click **OK** to close the "Remote Desktop Users Properties" dialog and complete the setup.
***
**Congratulations!** You've successfully created a new user account, you can now and try logging in via Remote Desktop using the new credentials.
Click **OK** to close the "Remote Desktop Users Properties" dialog and complete the setup.
***
**Congratulations!** You've successfully created a new user account, you can now and try logging in via Remote Desktop using the new credentials.