> ## Documentation Index
> Fetch the complete documentation index at: https://centrixnodes-mintlify-039aa6e3.mintlify.site/llms.txt
> Use this file to discover all available pages before exploring further.
# Install a FiveM server on a Windows VPS
> Install and launch a FiveM GTA V roleplay server on a Windows VPS or dedicated server: download the artifact, configure server.cfg, and start it.
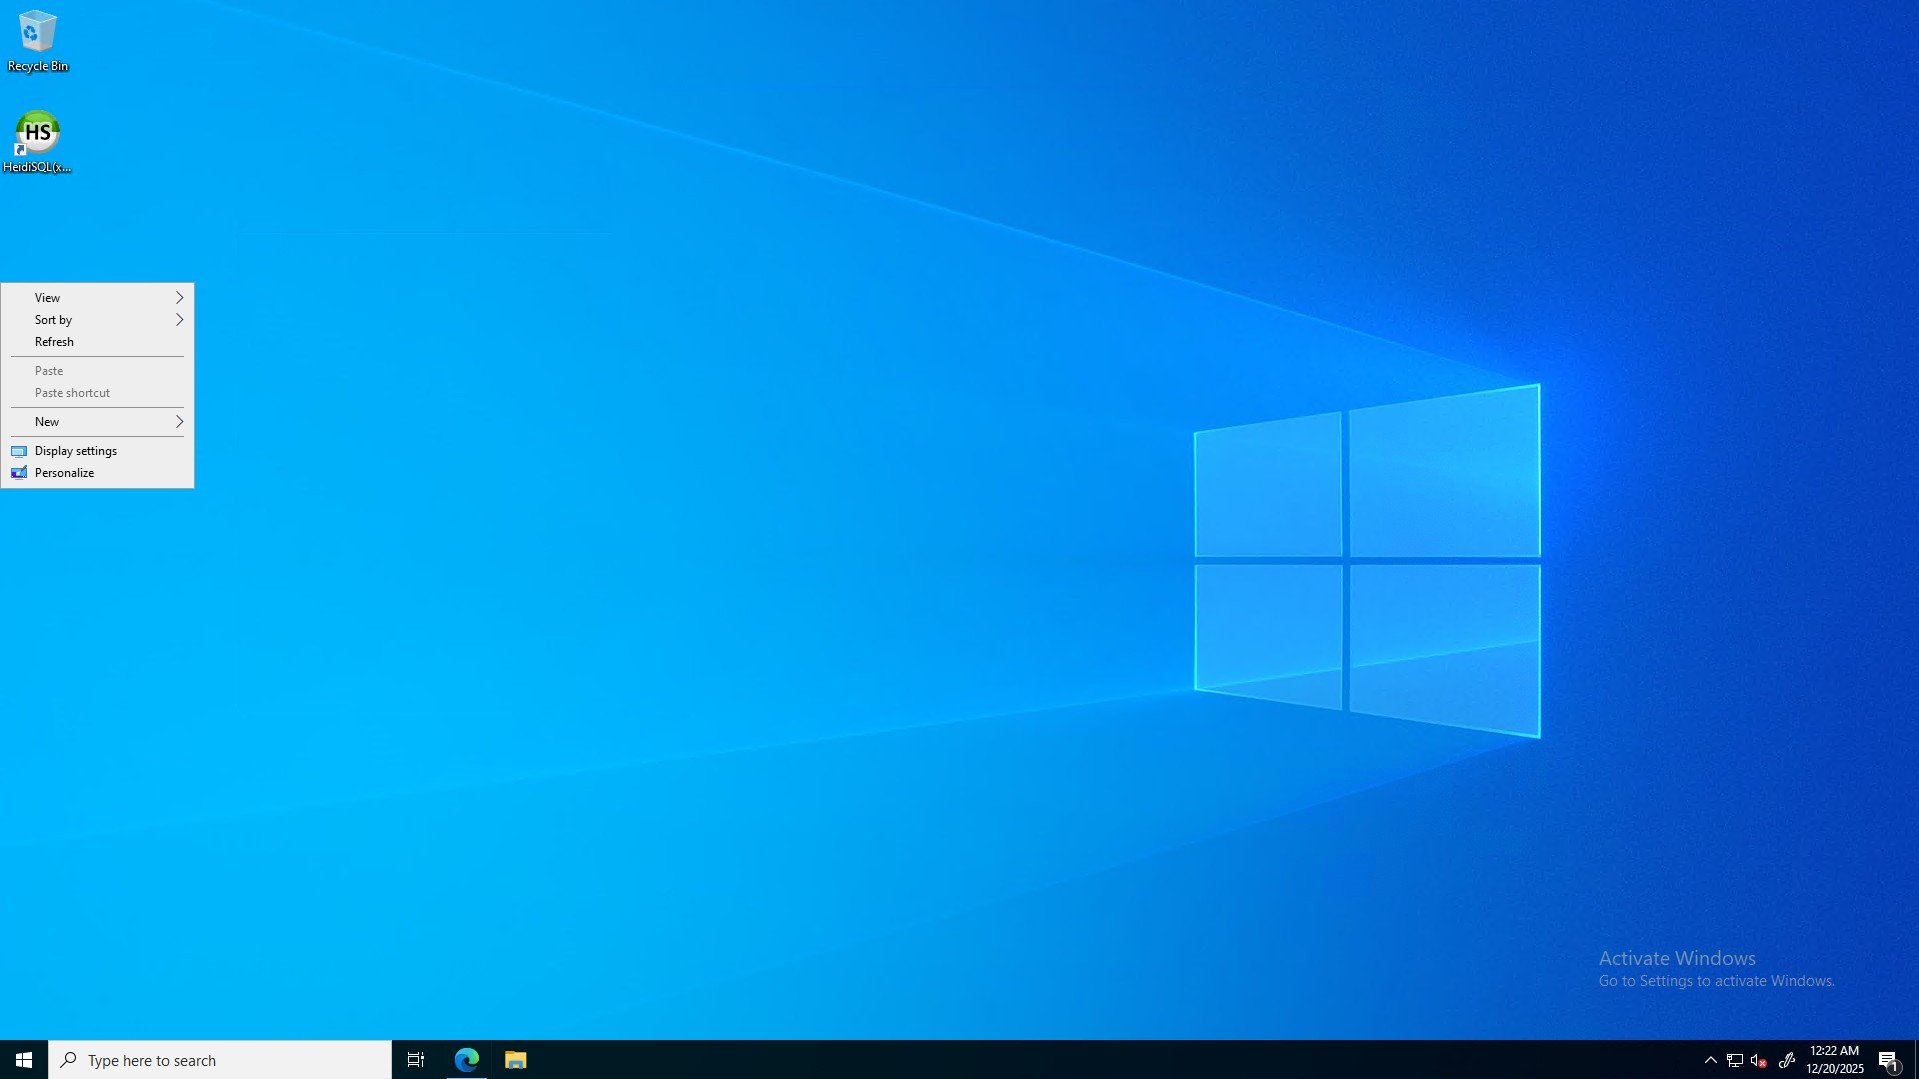
### Step 1: Make a new folder
Right click on your desktop and select "new" then "new folder" and name it "whatever" and then open it.
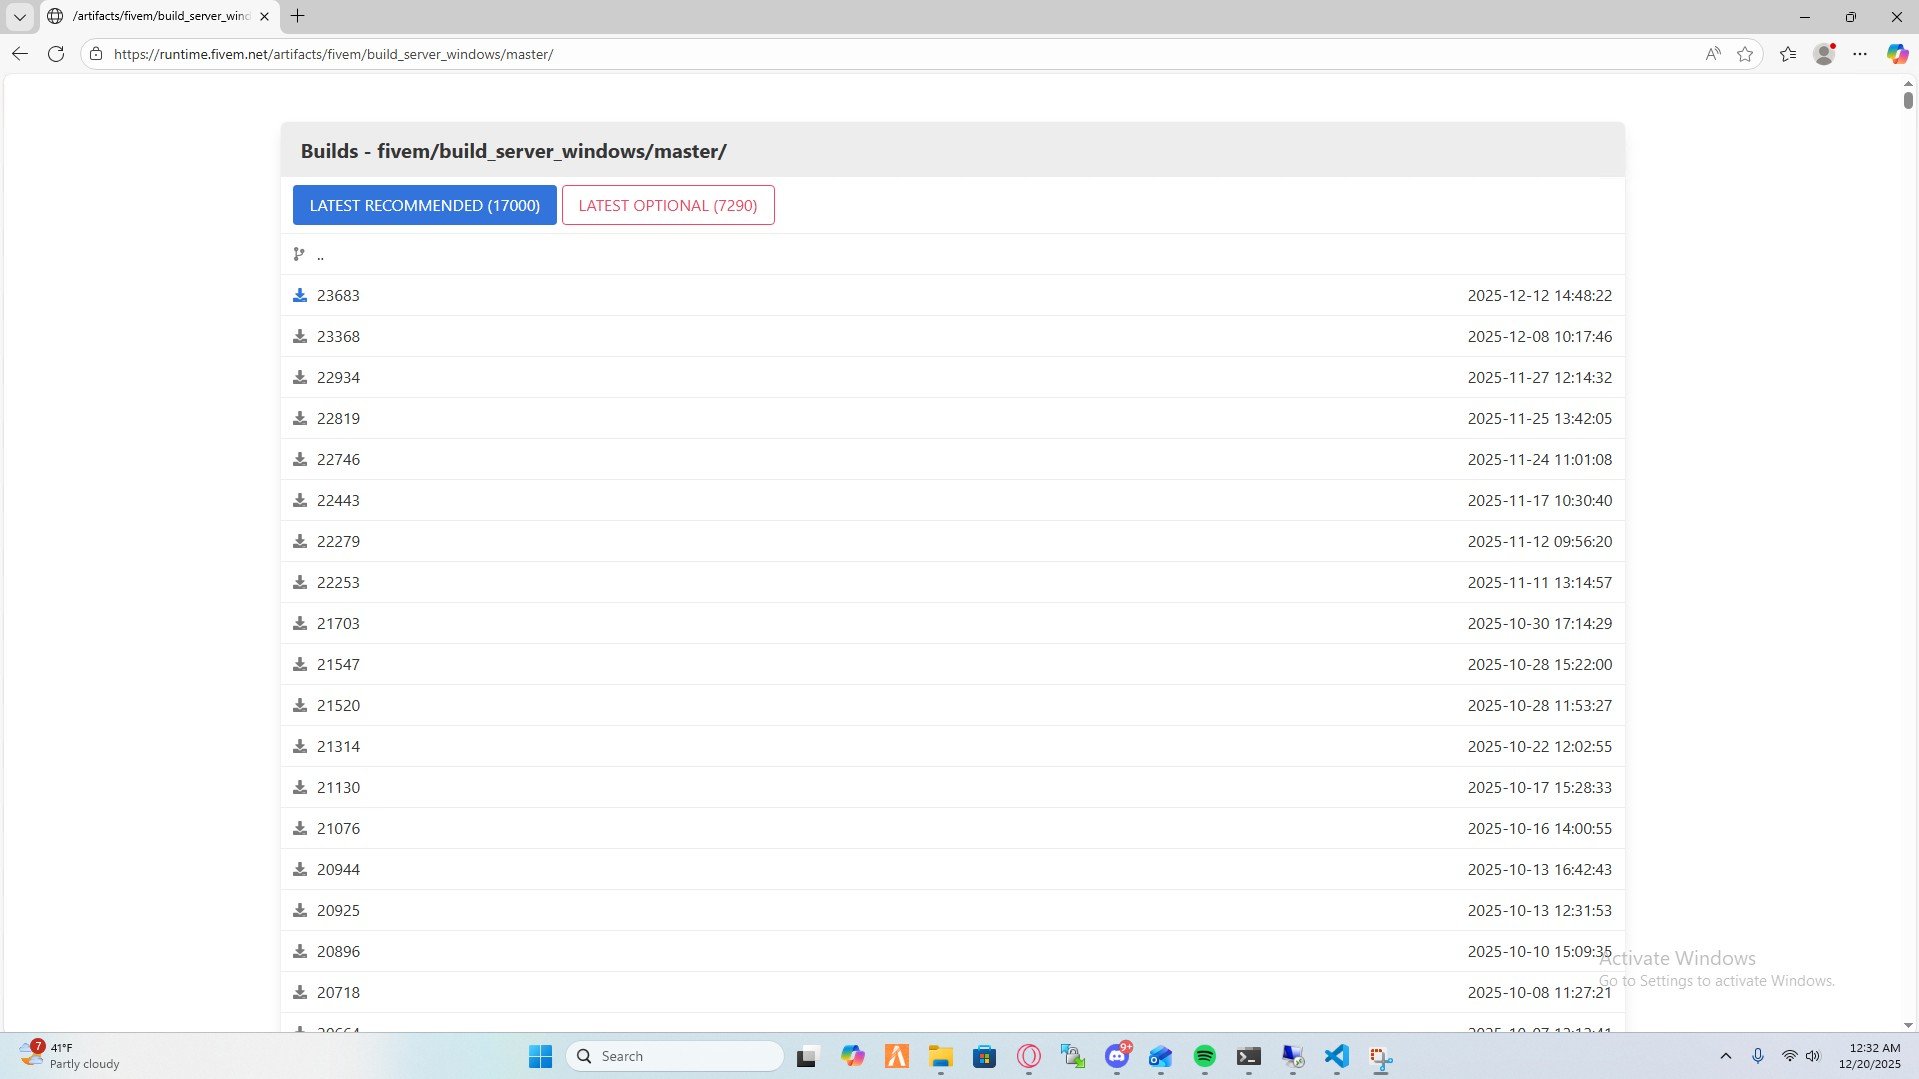
 ### Step 2: Download FiveM server files
Go to the FiveM Runtime website and download the server files. Here's a link to the download page: [FiveM Runtime](https://runtime.fivem.net/artifacts/fivem/build_server_windows/master/)
### Step 2: Download FiveM server files
Go to the FiveM Runtime website and download the server files. Here's a link to the download page: [FiveM Runtime](https://runtime.fivem.net/artifacts/fivem/build_server_windows/master/)
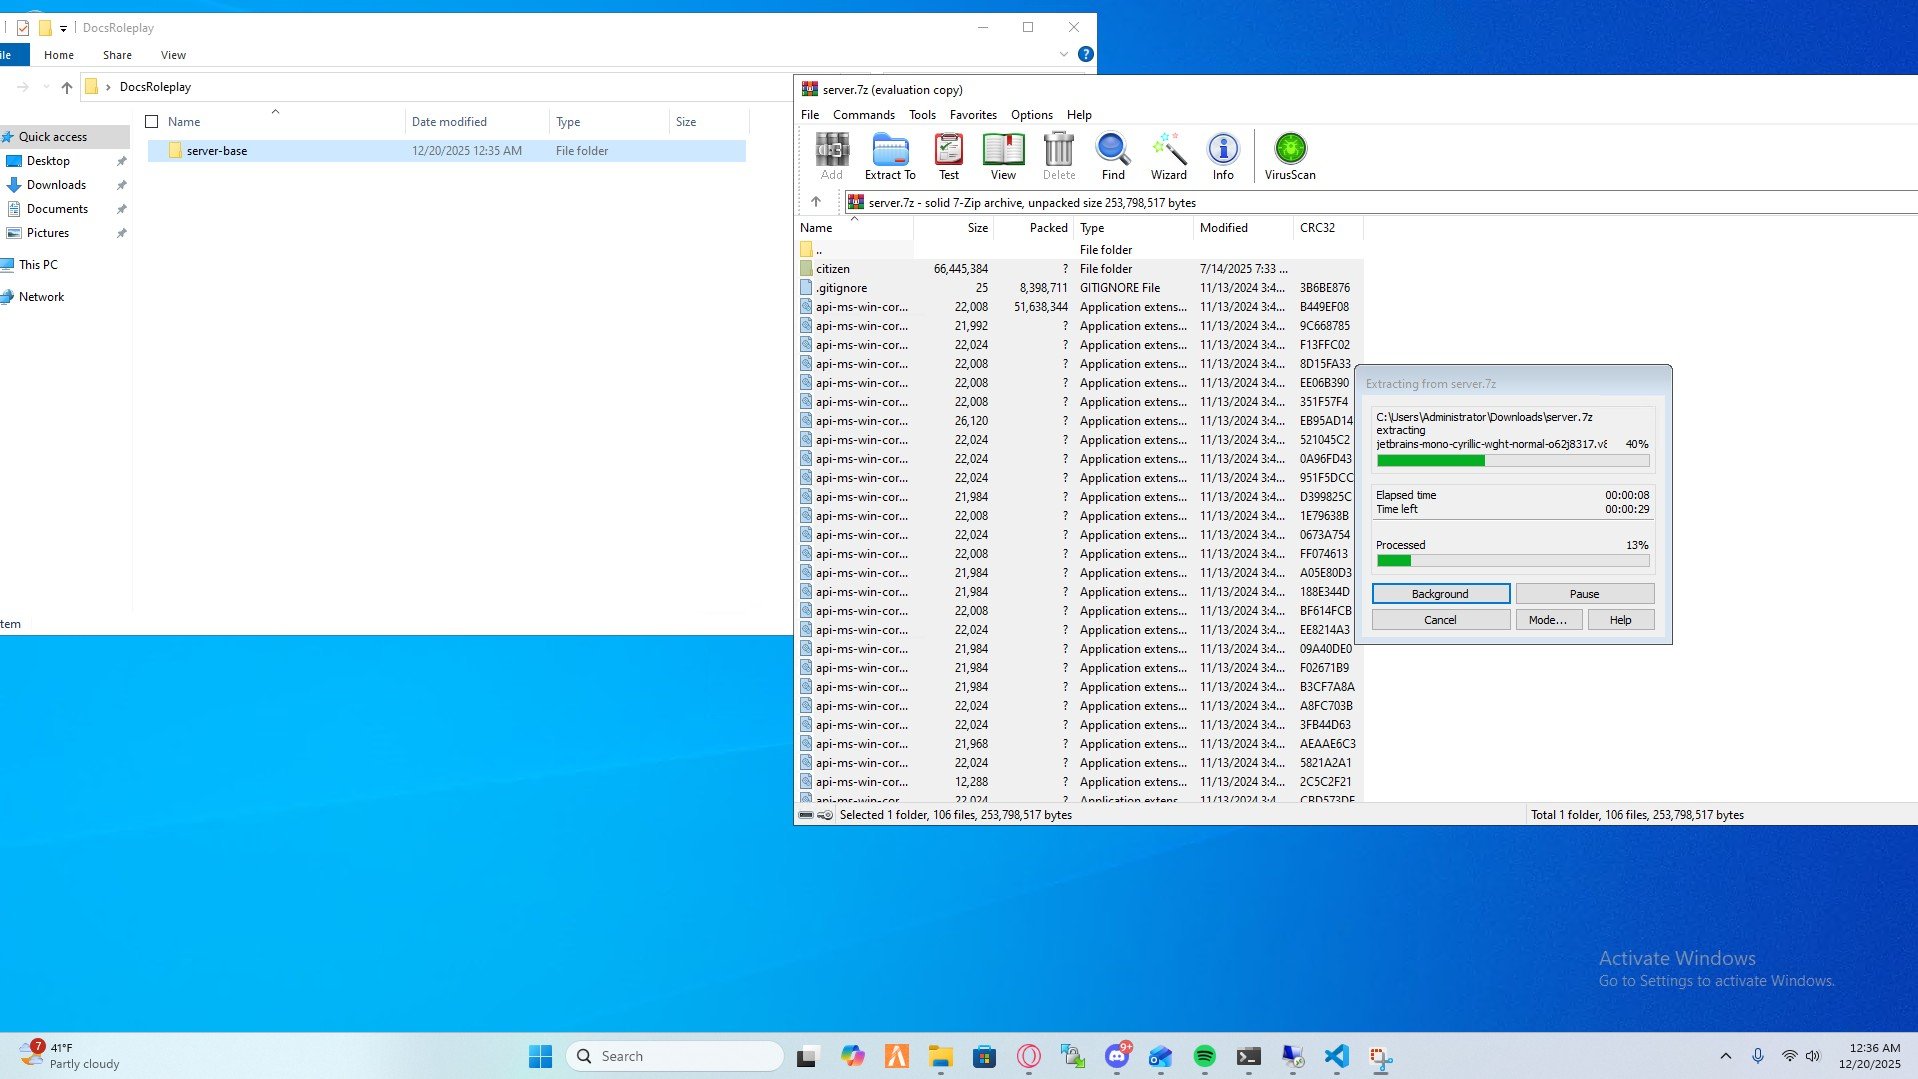
 ### Step 3: Extract the downloaded files
Create a server folder inside the folder you made in step 1 and extract the downloaded files into it.
### Step 3: Extract the downloaded files
Create a server folder inside the folder you made in step 1 and extract the downloaded files into it.
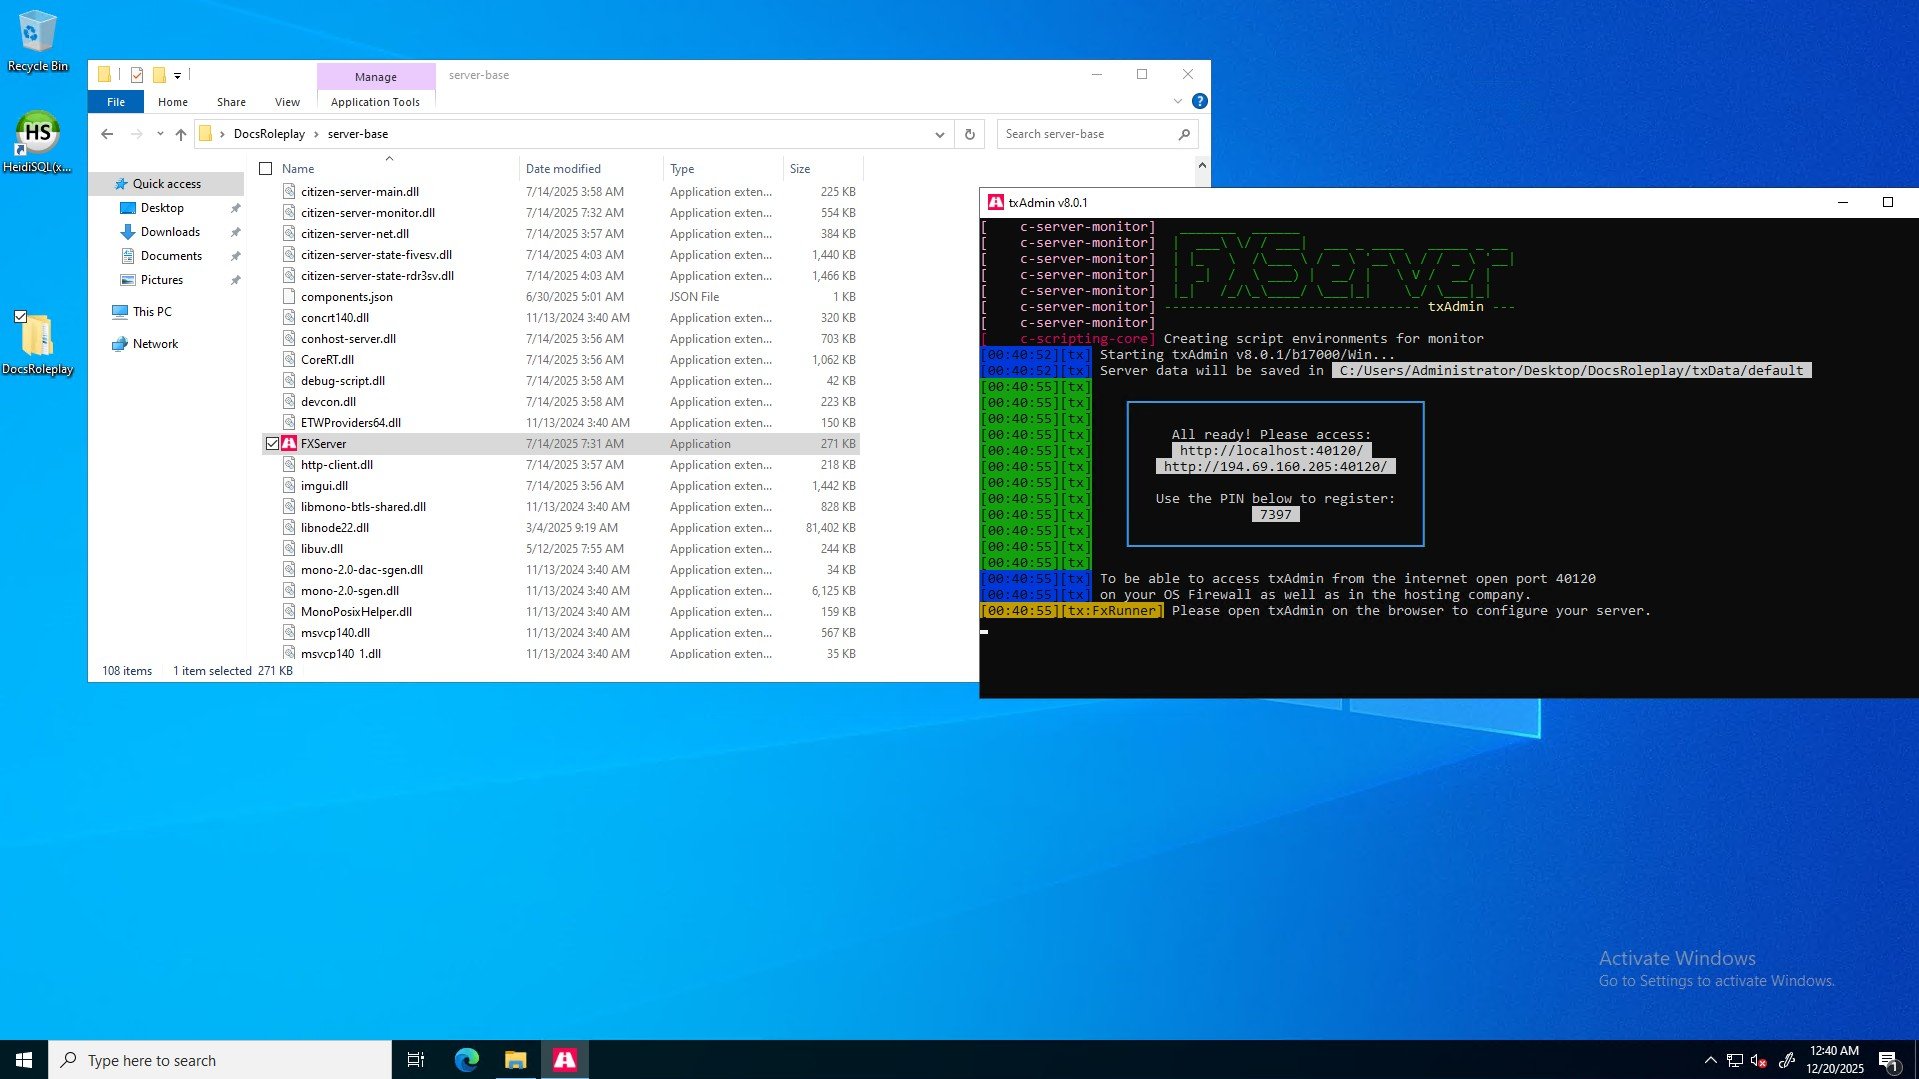
 ### Step 4: Start your server
Open the folder you created in step 3 and find the FxServer.exe file and double click on it to start your server.
After you start the server it will open a browser window with the txAdmin panel. Put in the code and proceed to step 5.
### Step 4: Start your server
Open the folder you created in step 3 and find the FxServer.exe file and double click on it to start your server.
After you start the server it will open a browser window with the txAdmin panel. Put in the code and proceed to step 5.
 ## Step 5: Configure Your Server Name
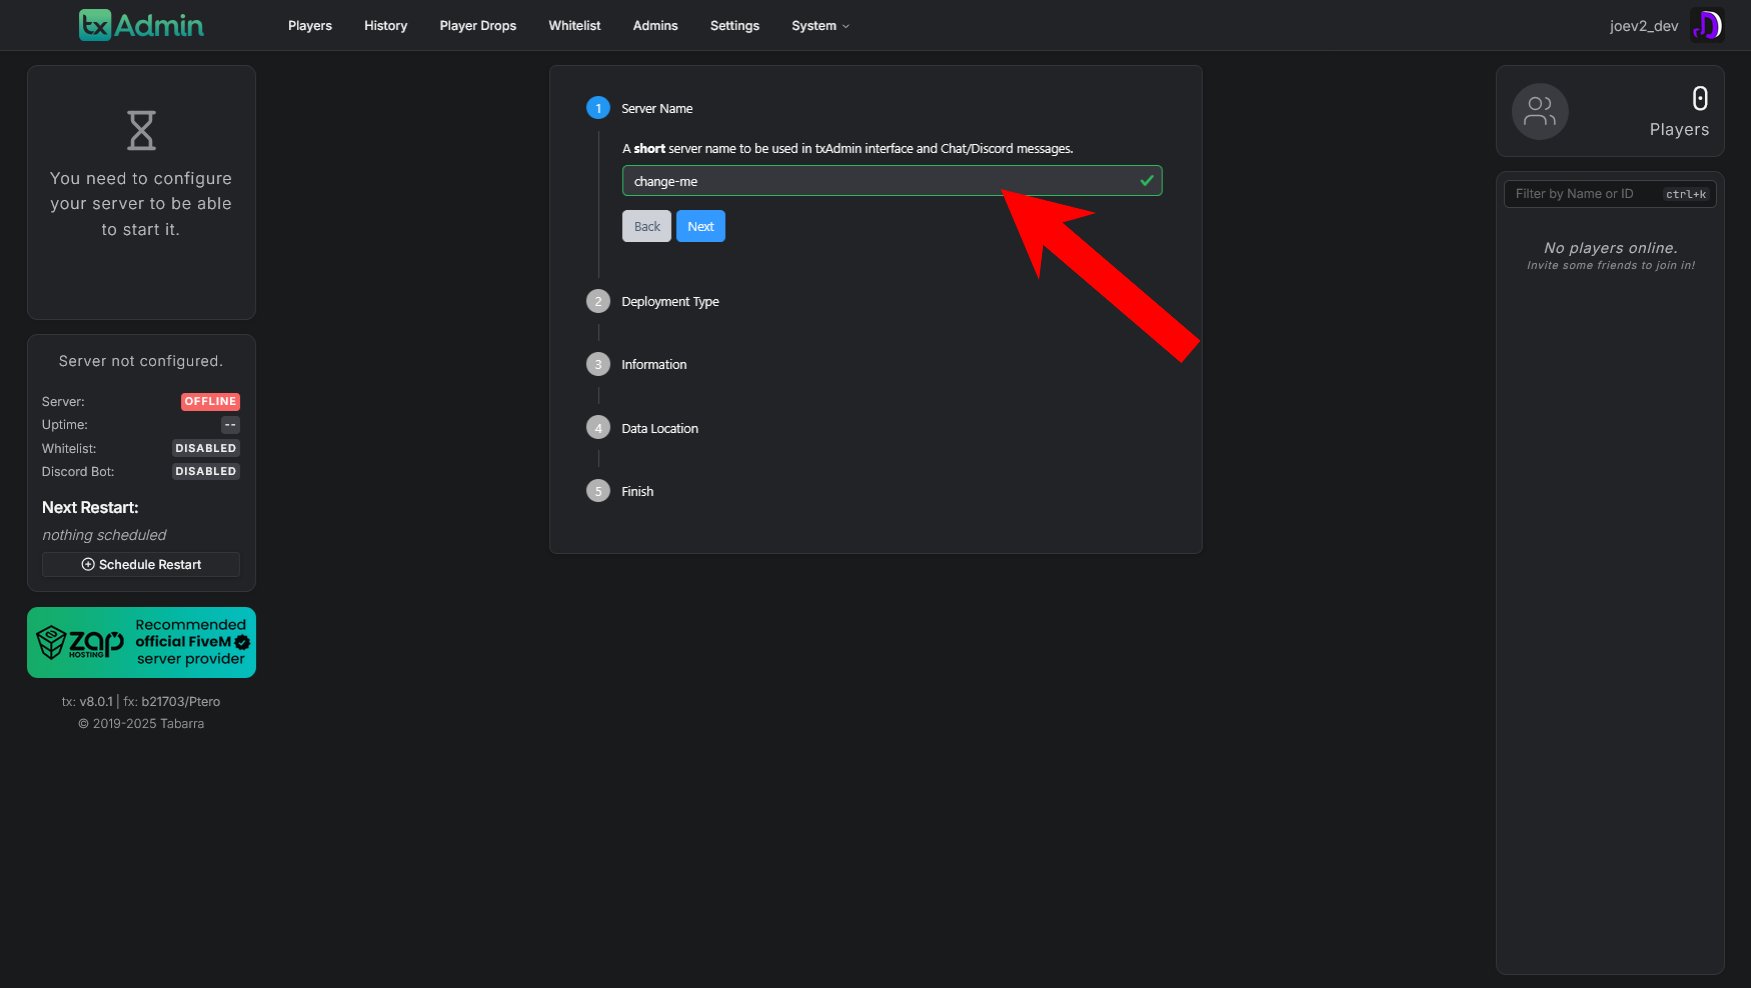
After accessing the txAdmin panel, you'll be prompted to set up your server configuration. Choose a short, memorable server name that will be used in the txAdmin interface and Chat/Discord messages (e.g., `tutorial`, `examplerp`, `dev`).
## Step 5: Configure Your Server Name
After accessing the txAdmin panel, you'll be prompted to set up your server configuration. Choose a short, memorable server name that will be used in the txAdmin interface and Chat/Discord messages (e.g., `tutorial`, `examplerp`, `dev`).
 ## Step 6: Choose Your Deployment Type
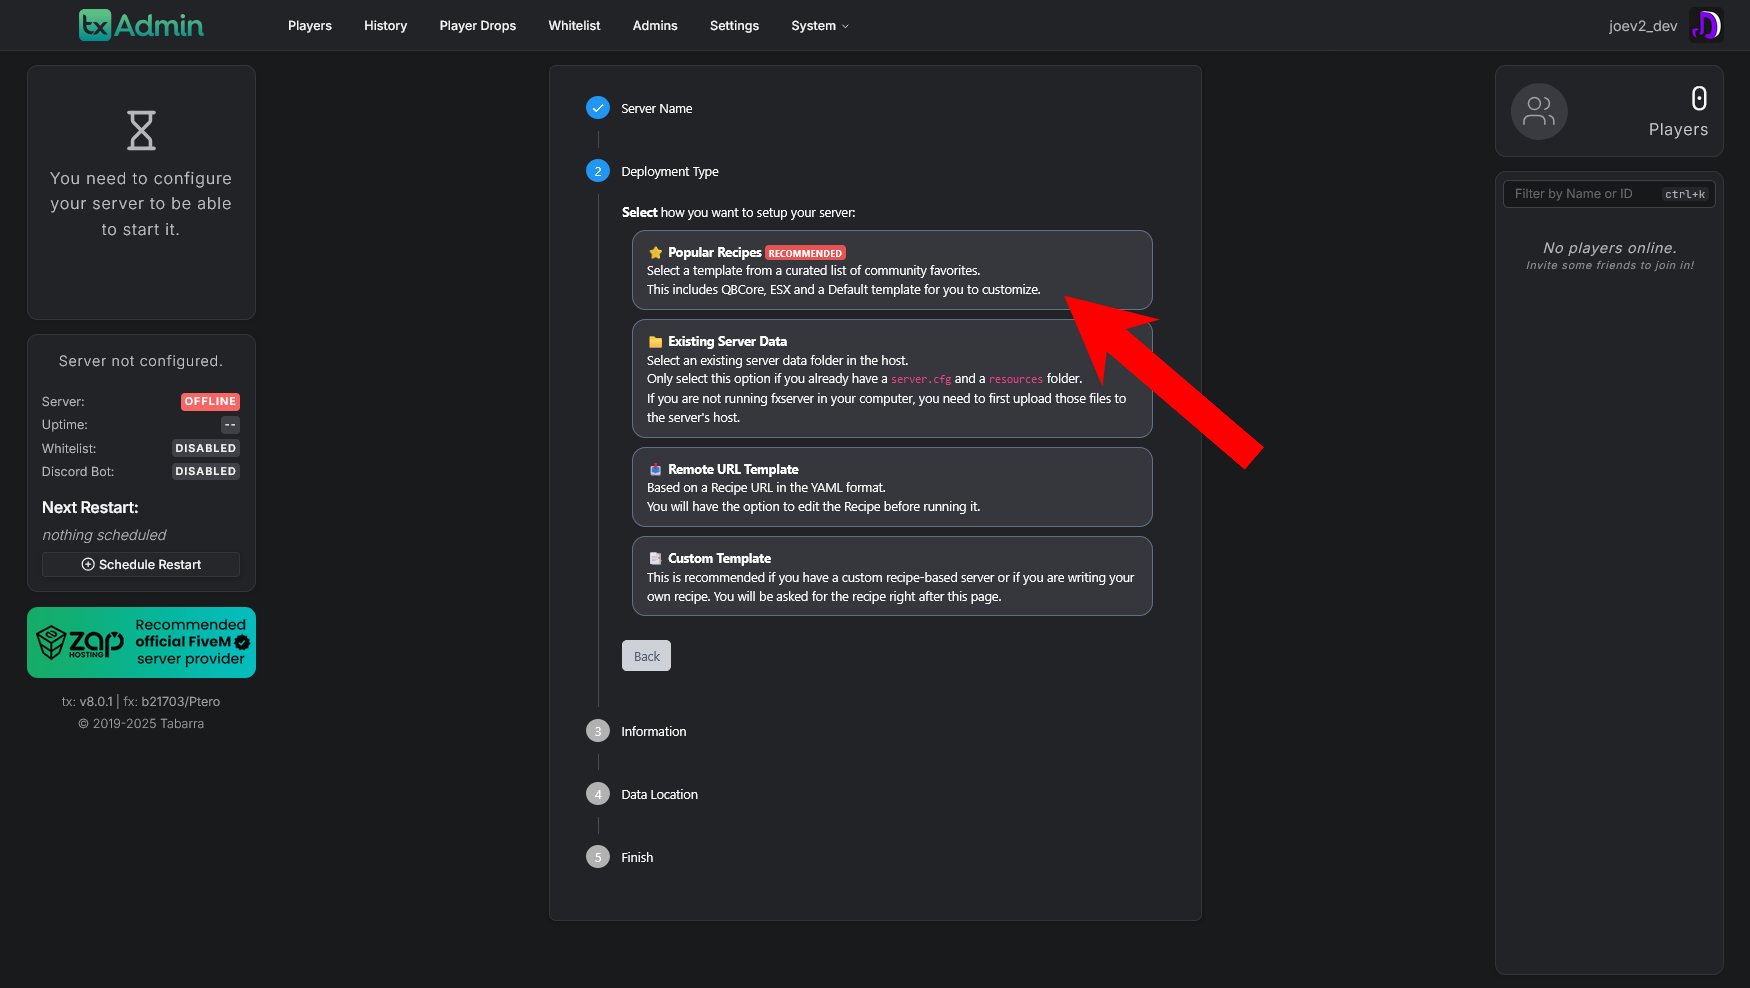
Next, you'll need to select how you want to set up your server. txAdmin offers several deployment options:
## Step 6: Choose Your Deployment Type
Next, you'll need to select how you want to set up your server. txAdmin offers several deployment options:
 ### Popular Recipes (Recommended)
This is the easiest option for beginners. Select a template from a curated list of community favorites. This includes QBCore, ESX, and a Default template for you to customize.
Choose **Popular Recipes** if you're new to FiveM server setup or want a quick start with a pre-configured framework.
### Other Deployment Options:
* **Existing Server Data**: Select an existing server data folder on the host. Only use this if you already have a `server.cfg` and a `resources` folder.
* **Remote URL Template**: Based on a Recipe URL in the YAML format. You'll have the option to edit the Recipe before running it.
* **Custom Template**: Recommended if you have a custom recipe-based server or if you are writing your own recipe. You will be asked for the recipe right after this page.
For most users, **Popular Recipes** is the recommended choice as it provides tested and working server configurations.
## Step 7: Review Recipe
After selecting your deployment type, you'll be presented with the recipe configuration. This shows you the YAML configuration that will be used to set up your server.
### Popular Recipes (Recommended)
This is the easiest option for beginners. Select a template from a curated list of community favorites. This includes QBCore, ESX, and a Default template for you to customize.
Choose **Popular Recipes** if you're new to FiveM server setup or want a quick start with a pre-configured framework.
### Other Deployment Options:
* **Existing Server Data**: Select an existing server data folder on the host. Only use this if you already have a `server.cfg` and a `resources` folder.
* **Remote URL Template**: Based on a Recipe URL in the YAML format. You'll have the option to edit the Recipe before running it.
* **Custom Template**: Recommended if you have a custom recipe-based server or if you are writing your own recipe. You will be asked for the recipe right after this page.
For most users, **Popular Recipes** is the recommended choice as it provides tested and working server configurations.
## Step 7: Review Recipe
After selecting your deployment type, you'll be presented with the recipe configuration. This shows you the YAML configuration that will be used to set up your server.
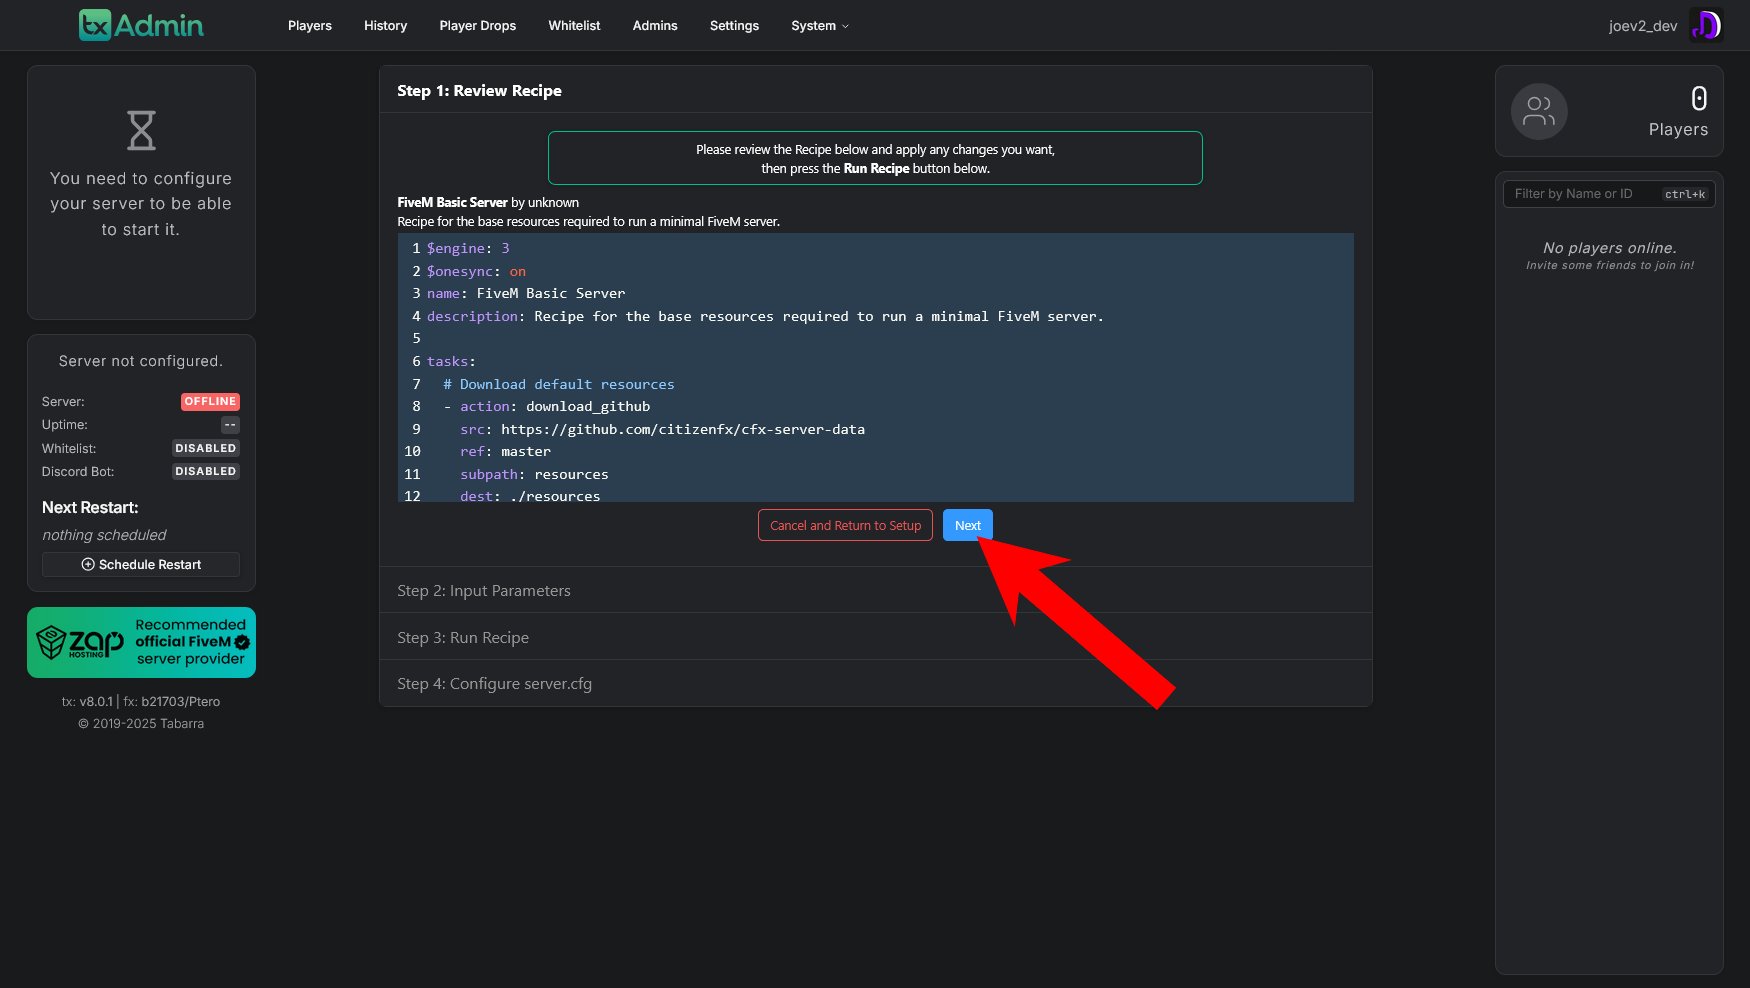 The recipe includes:
* **Engine version** (e.g., `$engine: 3`)
* **Server name** and description
* **Tasks** that will be executed (downloading resources, configuring files, etc.)
* **Source repository** information (where resources will be downloaded from)
You can review the recipe and make any changes if needed. However, for most users, the default configuration works perfectly.
Simply click **Next** to proceed with the default recipe configuration. The recipe is pre-configured to work out of the box.
## Step 8: Enter Server Registration Key
Now you need to enter your FiveM Server Registration Key (formerly known as License Key). This key is required to run a FiveM server.
The recipe includes:
* **Engine version** (e.g., `$engine: 3`)
* **Server name** and description
* **Tasks** that will be executed (downloading resources, configuring files, etc.)
* **Source repository** information (where resources will be downloaded from)
You can review the recipe and make any changes if needed. However, for most users, the default configuration works perfectly.
Simply click **Next** to proceed with the default recipe configuration. The recipe is pre-configured to work out of the box.
## Step 8: Enter Server Registration Key
Now you need to enter your FiveM Server Registration Key (formerly known as License Key). This key is required to run a FiveM server.
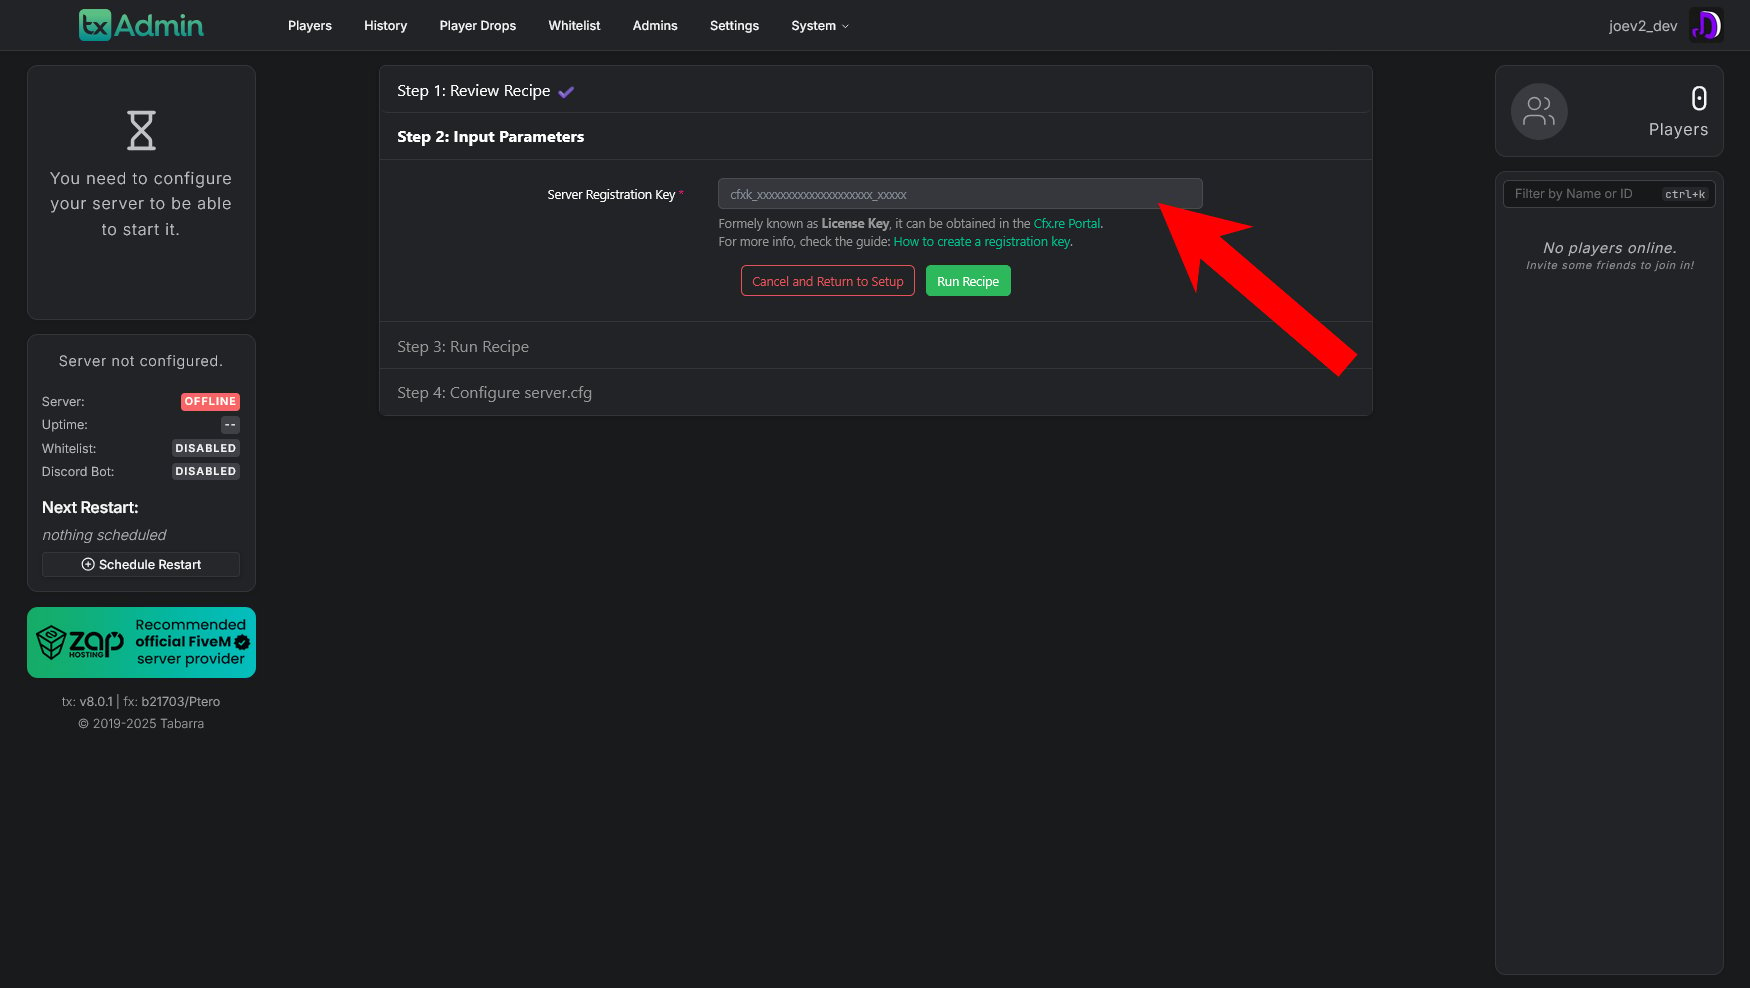 The key can be obtained from the [Cfx.re Portal](https://portal.cfx.re/). Enter your registration key in the field provided.
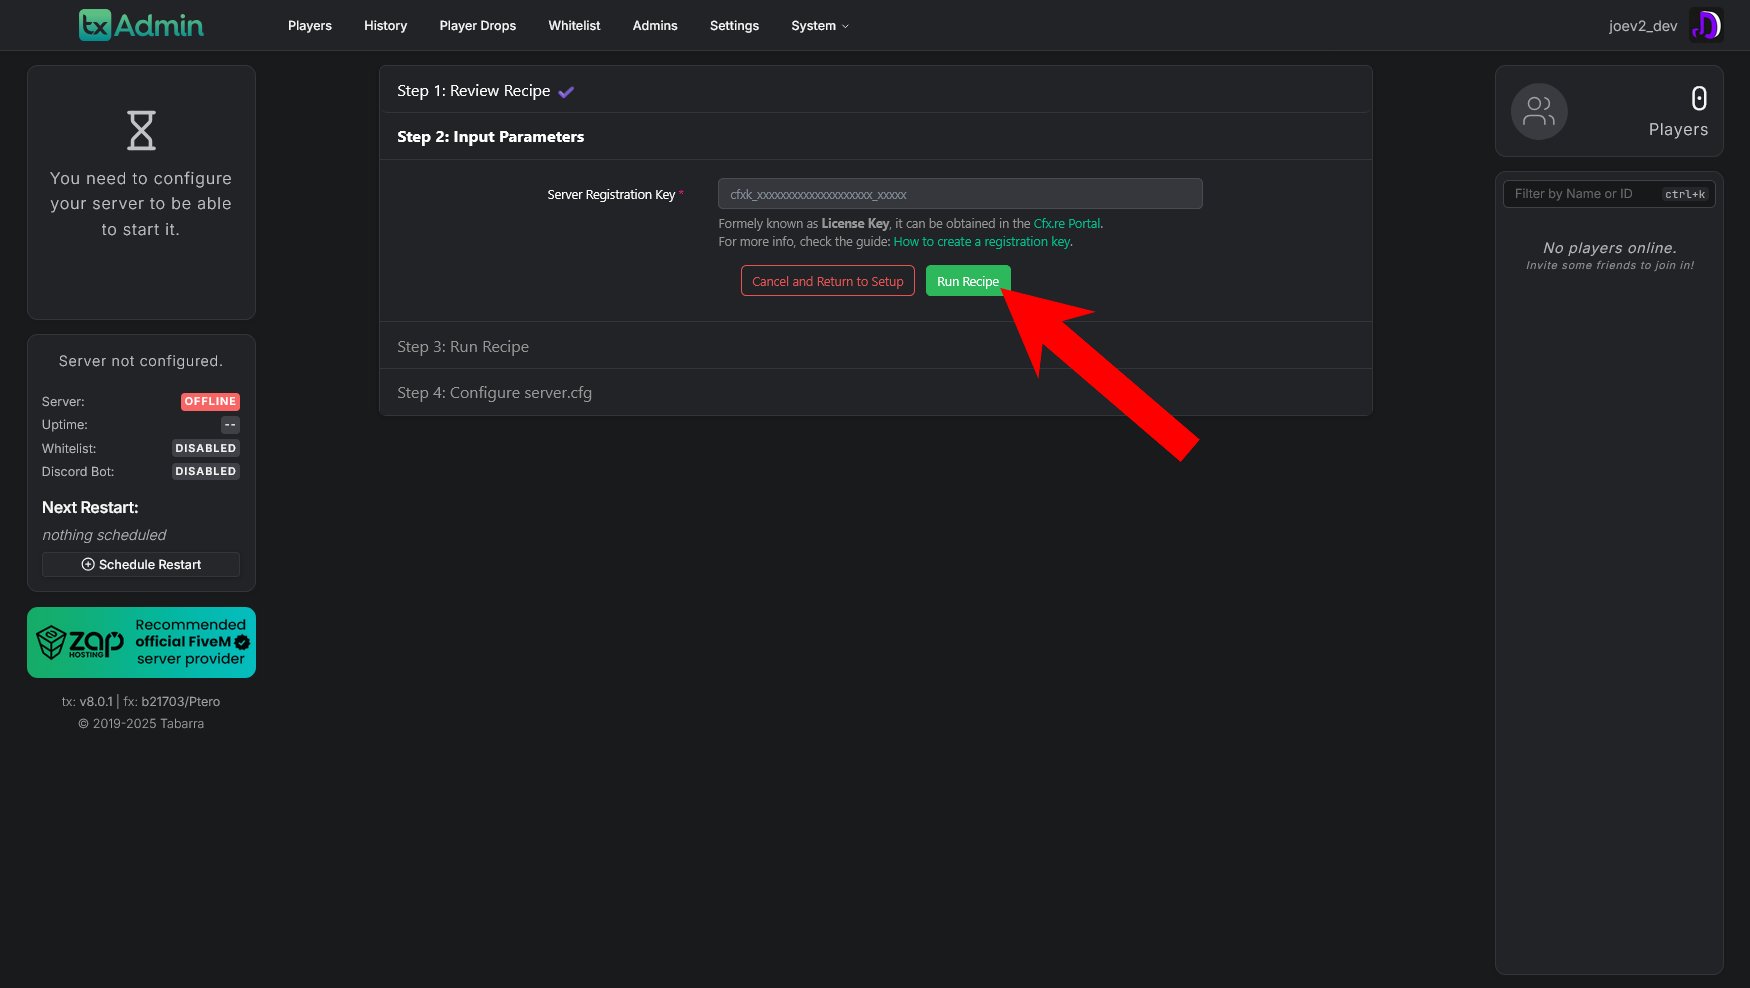 If you don't have a registration key yet, visit the Cfx.re Portal to create one. For more information, check the guide: [How to create a registration key](https://docs.fivem.net/docs/server-manual/setting-up-a-server/#license-key-registration).
Once you've entered your key, click **Run Recipe** to proceed with the server setup.
## Step 9: Configure server.cfg
After the recipe runs, you'll be presented with the `server.cfg` file editor. This is your server's main configuration file where you can customize various settings.
If you don't have a registration key yet, visit the Cfx.re Portal to create one. For more information, check the guide: [How to create a registration key](https://docs.fivem.net/docs/server-manual/setting-up-a-server/#license-key-registration).
Once you've entered your key, click **Run Recipe** to proceed with the server setup.
## Step 9: Configure server.cfg
After the recipe runs, you'll be presented with the `server.cfg` file editor. This is your server's main configuration file where you can customize various settings.
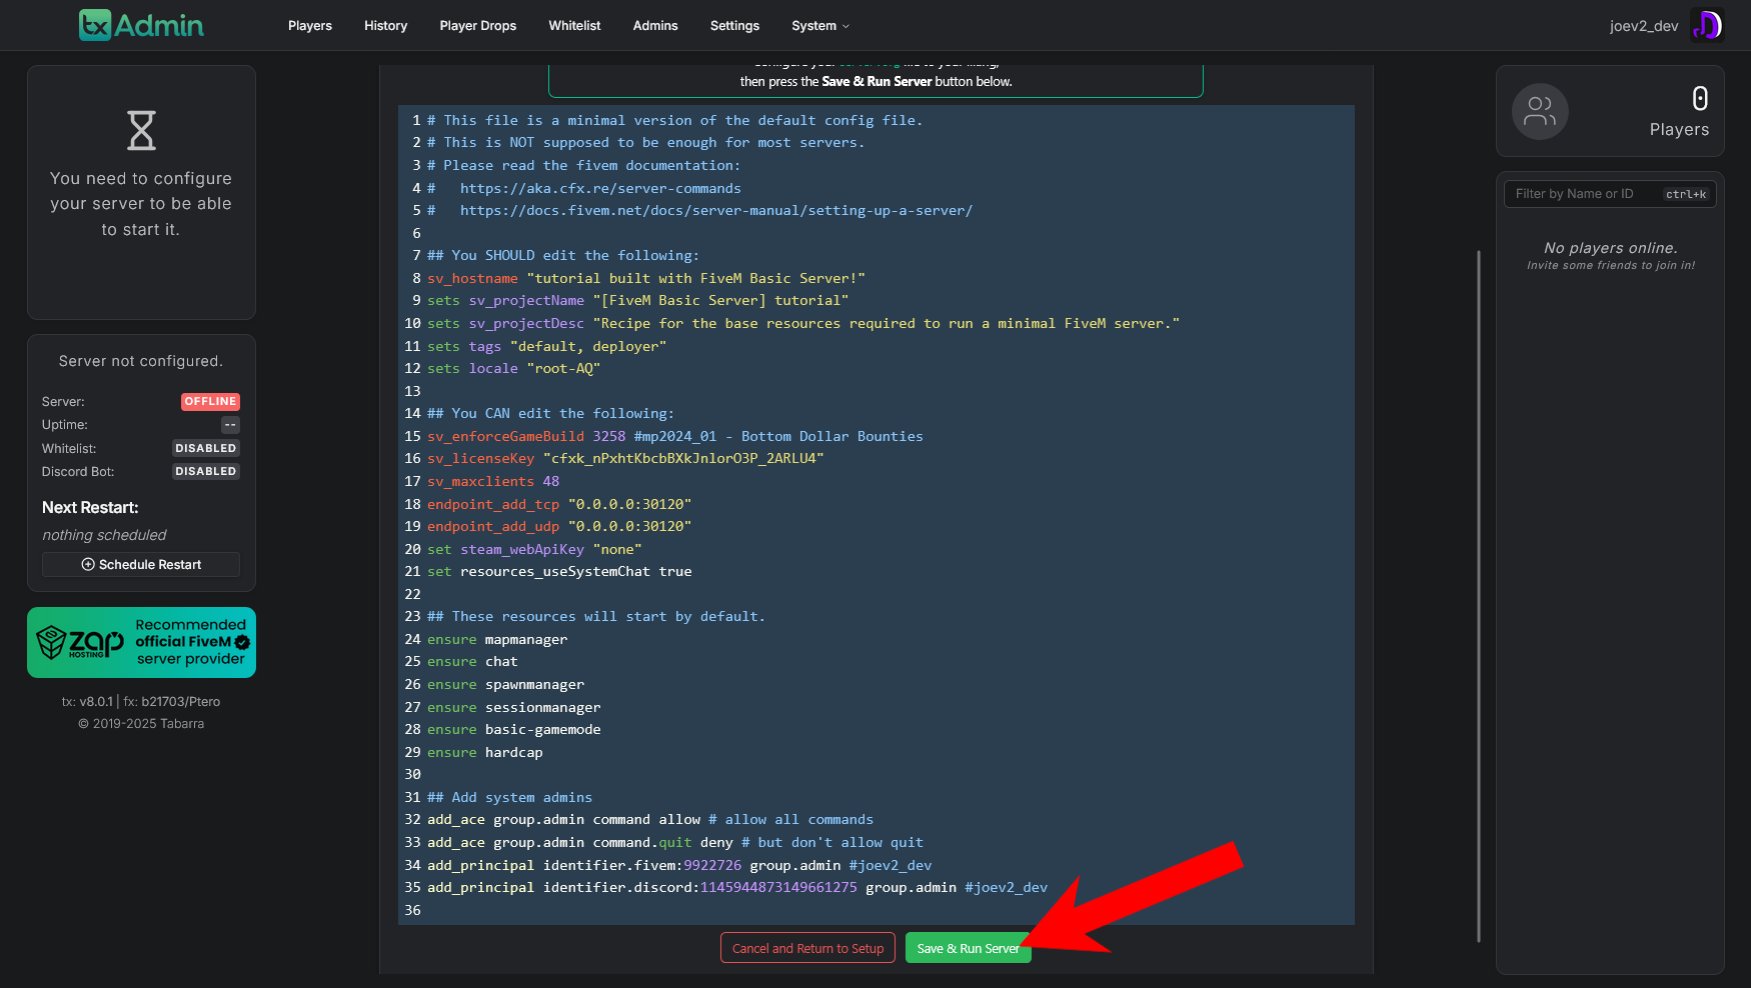 Click **Save & Run Server** to start your FiveM server.
## Step 10: Port Forward Your FiveM Server
Coming Soon!
***
**Congratulations!** If you've followed all the steps correctly, your FiveM server should now be up and running. You can access your txAdmin panel to manage your server, view players, and configure additional settings. Everything should be good to go!
Click **Save & Run Server** to start your FiveM server.
## Step 10: Port Forward Your FiveM Server
Coming Soon!
***
**Congratulations!** If you've followed all the steps correctly, your FiveM server should now be up and running. You can access your txAdmin panel to manage your server, view players, and configure additional settings. Everything should be good to go!